As can be seen in the above photo, I've been able to get another city block wired up and lit. While I'm waiting for all my track to arrive for my expansion, I've had some time to work on smaller projects that I've skipped over; wiring and adding my buildings is one of those projects (ballasting my track and 'painting my rails' is another one).
I've had this 'plan' for this second city block for quite some time. Its a challenge as it incorporates the Vollmer cathedral, which is far deeper than most buildings and therefore extends the entire width of my 'blocks'.
An idea struck me that I think may improve both the city block and the cathedral. What I'm thinking of doing is moving the cathedral to the current (well, 'proposed') site of my 'tram stop'. This area is also the sort of 'dead zone' inside my track oval that is difficult to integrate square buildings easily.
Of course, this change means that the tram stop and tracks need to move. I have few options as you'll notice a bridge over a road (which leads to a tunnel) that would be very difficult to move. The nice thing about moving the tram stop is that I can use the area on both sides of the church for both a smaller tram stop and a sort of 'plaza' or parking.
Another option, and one I don't care too much for, is to turn the church 90 degrees. Hmmm....I don't care too much for how this looks, but it would require a lot less work!
Another project that I must absolutely get to next is road striping. I'm a bit tired of looking and plain streets and I also think that it'll be a lot easier to add striping now before too many structures or details are added later.
Okay, that's it for now...back to the train room!
9.17.2010
9.11.2010
Track-work
While I wait for my new Minitrix switches to arrive from a couple of US, Canada, and European sources; and my Tomix cant track curves from Japan (who would've thought model trains would be so international?) I've been taking care of some various projects in preparation for the new track.
My first task is the result of admiring several layouts where the owners have painted their track a rust or dark brown color. When I first really started to notice this technique it scared me....I usually spend extra time trying NOT to get any paint, dirt, etc... on my track! But to deliberately do it? That scares me, and I assumed that the folks who did this were designing non-operating dioramas versus working layouts. As time went by, I realized this was not the case. So I've jumped onto the bandwagon of rail painters!
Since using a brush for this effort sounds really tiresome, I tried to use a device that looks fairly simple to paint the rails, but I really wasn't happy with the results and found the effort to apply the paint fairly exhausting. My 'fall back' plan was to use an airbrush. Although I've had a Paasche VL double-action airbrush for a couple of years, I never been able to achieve good results. It turns out the problem wasn't the airbrush or the paint, but an older compressor from Badger that just wasn't putting out the pressure that I needed! I recently bought a cheap 85psi air compressor and the results are amazing! Its really noisy, but as my layout and most of my work occurs in the garage, this isn't a problem for me.
My color of choice has been Tamiya Red Brown. Its also easy to get and I've heard good things on various message boards about how well Tamiya works for air brushes. I have to say, I've been very impressed. The only challenge is trying to not get too sloppy or rush too much and end up with excessive 'rusty ballast'!
What I don't know yet, is whether or not any part of my fears of doing this were justified. I'll find out soon enough.
Speaking of ballast, that's been my other project. Given the mix of Kato Unitrack, Atlas flextrack and Minitrix switches (not to mention several sections of Fleischmann profi-track flex track AND Tomix cant track curves!) I need to unify the look. Painting the rails is one part, but adding a consistent ballast color is the next part. Below is an example of the two methods I used of applying 'rust' to rails (the track in the background was with Tamiya using the airbrush, the track in the foreground used a dark brown and roller device I mentioned), as well as the 'wet' ballast waiting for vacuuming and touch ups tomorrow. Doesn't look great now, but an improvement over what I used to have.
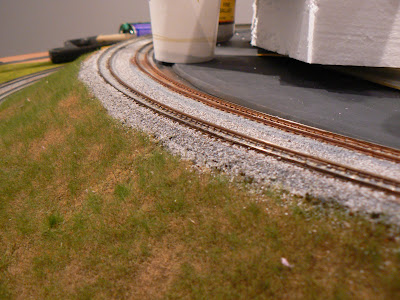
Let me say that despite my growing enthusiasm for some of the non-Kato track pieces I'm using, ballasting is still not fun. But I'm muddling through it and hopefully learning a bit more about how to do it correctly without everything looking like the surface of the moon instead of realistic railroad ballast.
The above photo also shows the 6 inch extension across for the city (in addition to my Unitrack ballasting). This minor extensions will be a sort of 'backdrop' using some of my excess buildings, and will also keep the trains away from the layout edge! I'm doing something similar further up the layout, but rather than buildings, this will be rolling hills.
I'm also preparing the yard by putting down the cork, in addition to soldering leads to my some of the yard trackage.
As you can see, and as I'm sure many of you will recognize from your own experience, the layout is an absolute mess right now. But its a good mess....this is leading up to some exciting improvements!
My first task is the result of admiring several layouts where the owners have painted their track a rust or dark brown color. When I first really started to notice this technique it scared me....I usually spend extra time trying NOT to get any paint, dirt, etc... on my track! But to deliberately do it? That scares me, and I assumed that the folks who did this were designing non-operating dioramas versus working layouts. As time went by, I realized this was not the case. So I've jumped onto the bandwagon of rail painters!
Since using a brush for this effort sounds really tiresome, I tried to use a device that looks fairly simple to paint the rails, but I really wasn't happy with the results and found the effort to apply the paint fairly exhausting. My 'fall back' plan was to use an airbrush. Although I've had a Paasche VL double-action airbrush for a couple of years, I never been able to achieve good results. It turns out the problem wasn't the airbrush or the paint, but an older compressor from Badger that just wasn't putting out the pressure that I needed! I recently bought a cheap 85psi air compressor and the results are amazing! Its really noisy, but as my layout and most of my work occurs in the garage, this isn't a problem for me.
My color of choice has been Tamiya Red Brown. Its also easy to get and I've heard good things on various message boards about how well Tamiya works for air brushes. I have to say, I've been very impressed. The only challenge is trying to not get too sloppy or rush too much and end up with excessive 'rusty ballast'!
What I don't know yet, is whether or not any part of my fears of doing this were justified. I'll find out soon enough.
Speaking of ballast, that's been my other project. Given the mix of Kato Unitrack, Atlas flextrack and Minitrix switches (not to mention several sections of Fleischmann profi-track flex track AND Tomix cant track curves!) I need to unify the look. Painting the rails is one part, but adding a consistent ballast color is the next part. Below is an example of the two methods I used of applying 'rust' to rails (the track in the background was with Tamiya using the airbrush, the track in the foreground used a dark brown and roller device I mentioned), as well as the 'wet' ballast waiting for vacuuming and touch ups tomorrow. Doesn't look great now, but an improvement over what I used to have.
Let me say that despite my growing enthusiasm for some of the non-Kato track pieces I'm using, ballasting is still not fun. But I'm muddling through it and hopefully learning a bit more about how to do it correctly without everything looking like the surface of the moon instead of realistic railroad ballast.
The above photo also shows the 6 inch extension across for the city (in addition to my Unitrack ballasting). This minor extensions will be a sort of 'backdrop' using some of my excess buildings, and will also keep the trains away from the layout edge! I'm doing something similar further up the layout, but rather than buildings, this will be rolling hills.
I'm also preparing the yard by putting down the cork, in addition to soldering leads to my some of the yard trackage.
As you can see, and as I'm sure many of you will recognize from your own experience, the layout is an absolute mess right now. But its a good mess....this is leading up to some exciting improvements!
8.29.2010
Quinntopia Expansion! Again!?
I've been struggling with the idea of expanding for some time. My original intention for my 'Version 3' (building off of "Version 2" naturally) of my layout was the trolley, viaduct, downtown expansion, and a 12" extension to the existing yard to add more storage and a passenger terminal. Below is the previous "Version 2" and those planned changes to "Version 3"
The above Version 2 was my expansion of "Version 1", what was where I was at when I started this blog! The new stuff, sort of highlighted in yellow, 3 is below:
The good news is that three of the four 'big items are, if not complete, at least at the stage where buildings, wiring, and the other final details need to be complete after major construction. The challenge I was facing with the final addition, the Passenger Terminal Extension, was that an additional 12 inches would make some of the areas on the 'southern' side of the layout more difficult to reach. I also started to think, or at least convince myself, that this layout doesn't need to be as 'temporary' or portable as I have - to date - been designing it. So I decided to push out the boundaries and expand. Below is my plan for "Version 4":
And what continues to keep me away from running trains or wiring all the buildings I've been working on has been this fundamental obstacle. The good news is that this summer I decided to bite the bullet (and overcome some interesting feelings of futility and doubt!) and move on to "Version 4" construction!
There were some nerve-wracking moments....smashing out the foundation on a section of my viaduct was not fun, although recalling the interesting stuff I can do with the extended main line kept me going!
Something else which will add more enjoyment to operations, is that the Red Line, which was pretty much land-locked within the green line on the lower level, now gets some elevation and a cross over. Just out of view on the left is really nice bridge I got from a company called "Hack" in Germany. Decently priced metal bridges!
The above explains my rather limited modelling posts over the past several weeks...I've been spending whatever precious hobby time I can get in the dust trying to move this along.
I've also realized something about my planning process with this project. I tend to create my plan in Rail Modeller as more or less a guide, but then plan on improvising or changing the actual plan once I start laying things out. I've got a more less 'fresh canvas' now so I don't know if I know for sure at this stage of planning what exactly I want to do.
I do know that I'll be using a bit more flex track...the beautiful sweeping curves that these afford compel me to bite the bullet (partly inspired by Pascal's beautiful work)! I'll also be converting my existing yard and installing the new Passenger terminal tracks using Minitrix's track rather than Unitrack (which was inspired by this). The reasons for this is that Unitrack - despite its great looks - just doesn't look completely right to me for a yard. Perfect for main lines and routes but-in a yard- the high ballast wasn't working for me. I chose Minitrix track as I really like the simplicity of their switch machines which allow them to be more or less 'hidden' from view without the complexity of installing under-table motors. We'll see how that goes in the future.
That's all for now! All I have to say is...goooooo N SCALE!!!
The above Version 2 was my expansion of "Version 1", what was where I was at when I started this blog! The new stuff, sort of highlighted in yellow, 3 is below:
The good news is that three of the four 'big items are, if not complete, at least at the stage where buildings, wiring, and the other final details need to be complete after major construction. The challenge I was facing with the final addition, the Passenger Terminal Extension, was that an additional 12 inches would make some of the areas on the 'southern' side of the layout more difficult to reach. I also started to think, or at least convince myself, that this layout doesn't need to be as 'temporary' or portable as I have - to date - been designing it. So I decided to push out the boundaries and expand. Below is my plan for "Version 4":
And what continues to keep me away from running trains or wiring all the buildings I've been working on has been this fundamental obstacle. The good news is that this summer I decided to bite the bullet (and overcome some interesting feelings of futility and doubt!) and move on to "Version 4" construction!
There were some nerve-wracking moments....smashing out the foundation on a section of my viaduct was not fun, although recalling the interesting stuff I can do with the extended main line kept me going!
Something else which will add more enjoyment to operations, is that the Red Line, which was pretty much land-locked within the green line on the lower level, now gets some elevation and a cross over. Just out of view on the left is really nice bridge I got from a company called "Hack" in Germany. Decently priced metal bridges!
The above explains my rather limited modelling posts over the past several weeks...I've been spending whatever precious hobby time I can get in the dust trying to move this along.
I've also realized something about my planning process with this project. I tend to create my plan in Rail Modeller as more or less a guide, but then plan on improvising or changing the actual plan once I start laying things out. I've got a more less 'fresh canvas' now so I don't know if I know for sure at this stage of planning what exactly I want to do.
I do know that I'll be using a bit more flex track...the beautiful sweeping curves that these afford compel me to bite the bullet (partly inspired by Pascal's beautiful work)! I'll also be converting my existing yard and installing the new Passenger terminal tracks using Minitrix's track rather than Unitrack (which was inspired by this). The reasons for this is that Unitrack - despite its great looks - just doesn't look completely right to me for a yard. Perfect for main lines and routes but-in a yard- the high ballast wasn't working for me. I chose Minitrix track as I really like the simplicity of their switch machines which allow them to be more or less 'hidden' from view without the complexity of installing under-table motors. We'll see how that goes in the future.
That's all for now! All I have to say is...goooooo N SCALE!!!
Subscribe to:
Posts (Atom)


