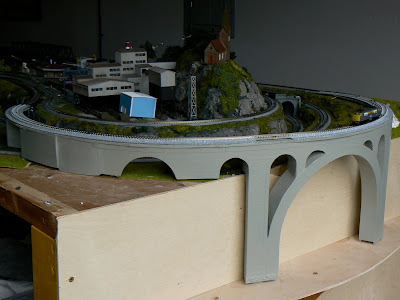
I've been able to spend some nice quality time working on the layout over this Christmas break, and have made some progress on the viaduct (background here), and barely just started with thinking about the new plan for the expanded downtown (background on that, here). The top photo shows the current progress on the viaduct, below are a couple of more shots from different angles. At this point I've probably added spackle, sanded, and painted about 4 times over most of the viaduct.
I'm still a bit concerned about the color of the viaduct...I think the longer I look at the color the less convinced I am that its correct (FYI: Its Testors "Dark Aircraft Grey" which I thought made a pretty decent concrete color). I'm going to stick with it and weather it to see if that helps make it look a bit more 'right' to me.
I'm really excited to start running trains across this bridge with the new Tomix cant track! There's still a lot of work left to be done on the viaduct beyond just weathering. I have some Evergreen plastics strips that will be attached to the viaduct and cover up the area where the track and playwood meet, then I will attempt to add 'handrails' around the entire viaduct using some wire and my sodering iron. And then of course there's adding the scenery to the blank plywood behind the viaduct!
City Progress:
At the same time that I'm working on the viaduct (which is convenient while I'm waiting for spackle or paint to dry), I've got all my layers of 'sintra' down for the city foundation (streets and so forth). The below photos are crude mock-ups to see how my tram/trolley line will work with some of the key buildings I have. I need to finalize the tram line plan and then start the tedious process of carefully cutting the sintra so that I can 'sink' my Tomix (and a few other makers) rails into the 'streets'.
My current plan for the tram line is a single end to end line that will loop and double back through the city, and then cross the 'ravine' in the middle of the layout to the little village on the other side.


Hello fellow modeller. Might I suggest that you fill the space between your Kato track with Woodland Scenics HO scale trackbed, cut to size. Kato trackbed and WS trackbed are both 5mm. high. Happy modelling, Philip Smeeton.
ReplyDelete