Showing posts with label N Scale. Show all posts

2.19.2017

GORHAM BUILDING COMPLETE

gorham building 1
Hello modellers!

Wow, it's been awhile since my last post. I've been busy!  I'll have a few more updates shortly.

I've been adding my buildings to the layout and arranging them, which also means putting together a few kits that have been sitting around.

I purchased CMR's Gorham Building several years ago (based on this actual building) and I decided to finally put it together. It's the ideal size for a certain spot, and decided it was time to get it on the layout!  Below is the plat where this new/old building will be installed.
The CMR kit is made of an interesting material.  It's a laser-cut sort of styrene or plastic. I actually really enjoyed putting it together. And while the pieces are all flat plastic, once complete they look really nice.

The instructions advise you to paint the structure after assembly, but as I wanted to use different shades of grey for the different layers, I sprayed them all beforehand and then glued after they were painted.


Interior detail was primarily limited the large ground floor entrance/lobby area.

I really like how this building turned out. in addition to lighting, I applied several coats of washes to really draw out the laser cut details that CMR puts on the pieces.
 More updates to follow! Thanks for reading!

6.07.2014

Preparing for the Next Stage

Well, its all over!  I have to say, now that I've gone through the demolishing stage it feels both liberating and exciting!  I have lot's of photos and lots of memories of 'Quinntopia Versions 1 though 4' and (more importantly) experience and thoughts about what to do better.  The above photo is - of course! - the infamous yellow legs that once held the layout.  I have a simple little table top (originally used to set up a 1/32 Carrera digital slot car system!) that I've put on top to have a place to clean and organize all the stuff.

Speaking of 'stuff'....Baronjutter (one of the many great people I've met through this blogging experience!  I've said it before but its worth repeating if you are new to this blog: I highly recommend starting a blog to share your hobby! Or at least connect and share on one of the N forums!) made a brilliant point that demolishing a layout really only means the loss of scenery and benchwork.  My benchwork was pretty shoddy and the scenery looks old after a while, so really I've only lost a little bit of track.

Where's all the other stuff? Here it is!

Below is most of the track.  For the time being its crudely organized by manufacturer and type (e.g. "Kato curves", etc...) and still needs to be cleaned and better indexed so I know what I've got on hand.  Also, some of it might be sold as well!
 I have short little shelf that I use to store small buildings on.  Most of these will be boxed up for re-use....or sold!
 Some of the larger highrises awaiting storage....

 Again, my workbench, now unusable until I clear some space out!
As you can tell from some of the above comments, part of the process right now is to make room and select what pieces will be a part of the next layout.  I already know that a trolley/tram line is out (I love the idea; but I could never get my trams to operate well except at high speed!), large yards and/or lots of switches are out; and a terminal-end passenger station will also be out.  Which means this big monster is surplus!
While I know I want to sell it, its so large, its not easy!  It basically has three parts: The terminal, the canopy structure, and the platforms.  The biggest problem is that the platforms are about 65" (1.65m!) long!  Combine that with a station that is 16" wide and about the same tall, and its a nearly impossible structure to shop in one box...more like three! And I just question...with all the hassle of getting this ready to ship, the size of this thing, the cost of shipping....is there any return in it for me to even both selling it? Should I just hang on to it?  Maybe just sell it to someone in the local area (Seattle? :-) )
Well, the station and canopy can fit in one box (I believe the box below is 18x18x24 - which is a huge box for shipping and will easily put shipping costs close to $100!).  But is this stations still cool without the platforms?  Geez...what other maniac would even have a layyout to fit this on! Am I crazy! :-)
What do you think?  And how much do you think its worth?  Since I built it custom, I feel its pretty unique, but its also 'home-made' and there's really no reference point to compare this to.  I've obviously also got a lot of time put into this building, so I don't want to just give it away! Quite a problem!

I still have some other stuff to put on eBay, thankfully not quite as problematic as the 'psuedo Berlin' terminal shown above! But this one is sort of 'in the way' at the moment for me mentally.  Guess I'll clean track until I figure out what to do!

8.30.2013

The Phantom History of Quinntopia

I was 13 years old and I was done with N Scale.

Goodbye ConCor PA's, Minitrix FM Switcher, Bachmann U36B, Rivarossi C-Liners and probably a few others that I just plain forgot about (still not sure where they ever wound up, but I'm pretty certain that my little brother ended up selling them at a swap meet!).  It is interesting that even by 1970's standards this was a pretty eclectic collection! 

I was fortunate to have a dad that did expose me to this mysterious magic of 'trains'...here I am (probably late 1973 or 1974) somewhere in Montana....

But by 1978 I was done with trains.  It wasn't so much 'girls and cars', as I was too nerdy for the former at that time, and too young/broke for any interest in cars.  For me it was mostly Sci-Fi (remember, the first Star Wars had just been released  and I was hooked!), Comic Books, Rock and Roll, and the early world of Atari, Intellivision and Mattel handheld electronics. 

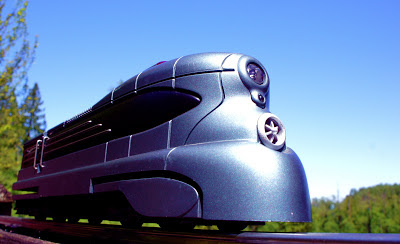
It wasn't until the late '90's, right after the birth of my first son, that a model train captivated my attention again. As I expect may have happened to many young parents....you make your way inside a local hobby or toy shop, and something more than you bargained for catches your interest.  This was 1998 and Lionel trains had just released a very controversial locomotive....the Pratt's Hollow Phantom!

The obvious sci-fi and somewhat (!) retro look of this locomotive got me into 3-Rail O Gauge, something I had never had any interest in previously. I was also impressed with their "Trainmaster Command Control", or "TMCC" command system, a sort of proprietary DCC system Lionel developed. Clearly, my memories of the inadequacies of standard DC control from my childhood were still with me, and this new 'digital' system seemed like a cool way to have more fun running trains!


As the years went by, my O gauge collection slowly. I even built a layout in my garage when we lived in California:

When we moved to Seattle a couple of years later, another O Gauge layout was built in the garage:


However, I was actually feeling somewhat frustrated with my 'new' hobby. The locomotives, rolling stock, and everything else is pretty expensive...on average at least 3 or 4 times the cost - if not more - for the same thing in N Scale. Of course, another drawback is that you really need a lot of space, and a lot of money, to do the kinds of things I wanted to have on my layout.

Then, I came across a Trix catalog in 2003 at a hobby shop in Oakland California (where we were living at the time), and the uniqueness, beauty and quality of the Minitrix line from that year blew me away. I was very quickly seduced from O into N.

A couple of years later, most (but not all) of my O Gauge stuff went up on eBay to fund my initial investment into N Scale. And the rest, is history! I still have the Phantom and its accompanying passenger cars, and I expect I always will.


(Nankai 50000 Rap:t from Japan; photo source: Wikipedia)
I may be posting this 'retrospective' of my model train hobby as I have the feeling (and this is has been a year) that it is time for a change.  The most obvious change that I am thinking of is to start a 'new' layout.  This means of course that the current layout must go.

Why a new layout? Despite how it may look to the viewer in photos and videos, there is much I need to improve on: Automatic / computer operation; more double-track main lines; a station or yard without terminal tracks; more reliable turnouts than the solenoid Minitrix motors; more sweeping curves and fewer tunnels; fewer grades; more space for the city; a more reliable tram line than I have now;  and probably a few more ideas have been in my mind for a while.

This is nothing new for many of us...the joy of the hobby is the progress/evoluation we make; with that 'perfect' layout or model being only the goal on the nearest horizon, not the ultimate culmination of the hobby itself.  Okay, that's too much philosophy for me!  I will post more on this of course when real changes start to be made!  As always, thanks for reading!

4.13.2013

Locomotive Roster: KiHa 261; MicroAce A-8673

Time for an overview of another new addition to my fleet! the KiHa 261 from MicroAce!
About the Prototype:
This is a MicroAce model of a DMU set that is operated by the Hokkaido Railway Company- or JR Hokkaido- which is based primarily on the northern island of Hokkaido (the nationalized Japan Railways were privatized in 1987 resulting in the establishment of several regional railway companies...sort of the reverse of the French nationalization of 1938 or the British nationalization after the Second World War).  Apparently, and not surprisingly, Hokkaido's isolation from the rest of the Japan railway network results in some unique Japanese trains, including these DMU's given the relative lack of electrification compared to the rest of Japan. 
The KiHa 261 (I still don't know what "KiHa" stands for) is apparently a more modern version of the KiHa 281 and 283 series (Kato makes a similar model in the 283 series).   There is also a very similar looking EMU used by the Hokkaido Railway in the 789 series which, with its contrasting green colors, would look cool next to the blue KiHa 261! 
In fact, it was this model's striking good looks and its excellent color scheme that caught my eye years ago and which fortunately arrived 'under the tree' this past Christmas! 
Printing and details look good, at least as far as I can tell not being very familar with the prototype.  I'm not sure if they are just as good or almost as good as a Kato model (or Kato's 283 specifically) but I'm satisfied. An extreme close up photo below shows pretty crisp lettering!
DCC Conversion:
I go into the DCC conversion process in the video, so I'm not inclined to repeat the same information if its unnecessary (let me know in the comments if you'd like to see the steps in a 'non video' format), but I followed a conversion process nearly identical as that which I did for the Kato Sunrise Express EMU which I followed from a post on the always useful JNSForum.

I have only added a decoder to the motor car, leaving the cabs in their default 'always on' mode for the time being.  The additional time/cost to add two additional decoders into the cabs for a barely noticeable change from white to red lights is something I don't prioritize too highly (yet, I usually save these projects for later retrofit type things).
Overall, I really like watching this little DMU set run around the layout.  The colors and shape have a nice appearance on the layout.   As this was my second MicroAce product (the Rap:t being my first) I knew that I could expect a good quality product at a decent price, so no disappointments.  The only problem I've experienced, and I'm not sure of the cause, was that one of the axles fell out of the bogies and disappeared somewhere on the floor!  I've spend a lot of time crawling around on my stomach trying to locate this lost axle, so until I do, this set will be operating a coach short! According to the Wikipedia article on this class, they often run as four car sets, so I'm okay with this! At some point, I will need to try and order a replacement axle, however.
And finally, I have to mention the 'family resemblence' of these units to the Dutch Koplopers.  I mention this in the video, but wanted to add a photo hear just because I think its sort of interesting!


12.28.2012

Locomotive Roster: Kato K2882; DSB Class My NOHAB


An addition from Denmark joins the fleet, courtesy of a Japanese manufacturer of an American based locomotive built in Sweden and purchased by me from a dealer in Germany.   How's that for globalism?
A couple of things I should mention that I didn't cover or realize when I created the above video review.  First, while the locomotive is commonly referred to as a "NOHAB", that is actually the name of the Swedish firm Nydqvist och Holm AB that licensed the GM F-series technology (nice site on this interesting topic here).  Well, if the locomotive is not called a "NOHAB", what is it called?  I believe the proper (though never used) designation is AA16.  I'm pretty sure that if I called this an "AA16" no one would know what I am referring to, but I think that's a pretty interesting bit of trivia.
Another interesting 'error' regarding the "NOHAB", is that the Swedish firm only made this unit for Norway, Denmark, and Hungary.  The similar version of this locomotive created for the SNCB in Belgium (and the CFL in Luxembourg) was actually created under a seperate license by manufacturer Anglo-Franco-Belge (AFB).  So these are not, technically, "NOHABs".

A bit off topic, is that getting a clear understanding of the SNCB "NOHAB" type locomotives is a bit confusing.  They were originally given the class numbers of 202 and 203 and later Class 53 and 52.  But I found investigating these classes in the Belgian fleet fairly confusing as many of the images or locomotives in these classes do not share the distinctive 'bulldog' or F-series faces, but rather the angular (which is sadly, not represented in N Scale) style that is distinctive of a lot of the older Belgian diesels.  It does look like it might just be the faces that are different, but I don't know for sure.

The prototype is interesting as well.  These locomotives are thought of highly with European rail fans, and seem to have similar respect from rail fans as the US F-series locomotives are in the states.  However, many of these locomotives appear to still be in revenue operation, although most of that is from 'second-hand' purchases from Kosovo and other countries.
Back to the Kato model.  Its everything you would expect from Kato.  Smooth running, good details and castings, sharp printing and paint.  Very solid.  Easily converted to DCC with an NEM 651 plug.

One warning however, is that the buffers are in fairly loosely and I've already lost one (something else I failed to mention in the video).

My only 'problem' with it is the black seemed so shiny that I had to do something I've rarely done before and applied a bit of weathering and some matte spray paint.  Below is a photo of the locomotive 'before....
And then 'after':
For my tastes, its a big improvement (although now the bogies are a bit too shiny! LOL! Something to work on at a later point!)!  I'm a big fan of black locomotives, and the sharp black and red colors of this DSB scheme look very industrial and bold!

I rate the locomotive highly on my scorecard in the review; a 4.75 out of 5, which I think is appropriate.  I am very pleased to see Kato produce this locomotive to modern standards.  Minitrix created this locomotive back in the 1970's (and until recently was still marketing them, although they were clearly not up to today's standards) and the old East German firm of Piko also produced the same locomotive back in the 70's or maybe the 60's.

11.11.2012

Video Montage #2 for 2012


As I try to optimize my hard drive to help my aging iMac out, I found I had a lot of video not yet used or shown, so I decided to create another 'montage' video of the layout.

Very hard to find any sort of theme in this video, mostly just some favorite layout shots.   Some of the shots go back several months before the station area or various areas of scenery were complete.

Also, have to give a huge plug for the excellent music from a band called "Methodic Doubt Music".  The track title is "Hero's Blood".  They seem to specialize in a genre of music called 'trailer music' which - not surprisingly - works very well for short little train videos!

Anyway, I hope you enjoy!

7.29.2012

The Terminal: Complete*

Well, not quite complete, but close enough for the time being that all the major parts are there now! At this stage, I'm pretty much done with all the major work on what has been a six month project.  Starting back in January with the 'elevation' of the ground over the track loop at this section of the layout, the creation of the platforms in March,  the construction of the bottom two floors of shops in March/April, the completion of the terminal structure in May, and really working on the overhead canopy and various lighting and construction problems for the past two months!

Below you can see some of the challenge....the station needs to sit flush with the ground on top of two layers of shops.  The wires also need to be routed to get below all of this stuff to get to the power!
But the biggest challenge has been the curved, 'glass' canopy that extends from the front of the station out over the tracks!  I considered several methods, but ultimately used clear transparency sheets which are thin enough that they naturally rest on the curved arches of the station.  The transparency sheets are held together with styrene strips that act as real bracing and support.
I also needed to route wires for the canopy and station interior lights (along with advertising signs) which, of course, added a lot more work time to the project.  The below photo shows the terminal complex in most of its entirety:
Although I was inspired by the new Berlin Hauptbahnhof, I was not trying to replicate it.  I did like the curving canopy and how it extends out over the front of the station.  In the below photo you can see the canopy coming out to provide a bit of protection at the entry:
Within the terminal interior, you can also see that I added a destination board that hangs from the roof so that travelers can 'see' the destination board when they enter the station and when they are on the main platform area.
I used 'warm white' LED strips attached to strips of styrene within the canopy section to provide light to the terminal.  Of course, further out on the platforms, lighting is provided by lights on traditional lamp posts.  I think the contrast turned out pretty well.
From a distance, as trains enter the terminal, I wanted to have a somewhat 'industrial' look to the canopy, so I used girders from Plastruct on all the arches (you can make them out just a bit below, but probably better in the above photo).  As I mentioned above, its not quite complete.  There are still some canopy sections that need to be finished, and there are going to be a lot more people and other details added to the platforms, but that is 'fun' stuff at this point in the game!
 I've previously show photos of the platform level concourse area with the stairways (salvaged from a Kato overhead station) and various shops.  However, with the lighting now installed in the canopy, I think it looks much better!
So that's it! A 6 month-plus project has finally (nearly) come to a close! I have to say that I am really glad. To be honest, I really don't have the patience for these super-long projects and get distracted or excited about other things so its been a real act of discipline to power through this project (without taking too many shortcuts). 

In fact, I hope, hope, hope to take a break from scratch-building for a long time!  Anyway, some more touch ups and some details and I can start to move both passengers and trains into the new terminal!  Whoohooo!!!

6.14.2012

Locomotive Roster: Centro Class 150/1; Graham Farish 371-326

I've been asked several times if I have any trains from the UK, and as other projects or trains have gotten in the way, I've yet to write up anything about this Diesel Multiple Unit from Graham Farish. So here it is!

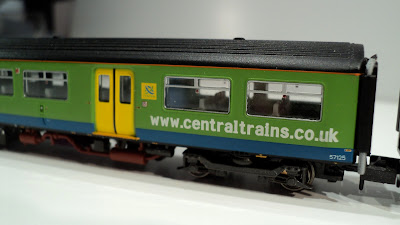
This is a Class 150-1 DMU (also referred to as "Centro" apparently?)  in the Central Trains livery, you can view my video review of this locomotive/coach combo in the above video, or read my comments in this blog post.

For one, I have to say the detailing and printing on this set is quite impressive.  Here's a few photos to share that point of view:
Its not merely the printing detail that I find well above average, but the extra molding/color that was put into the underframe details (Note! There are a lot of little detail pieces and careful handling is required or you may lose / break one of these pieces! Yes, it happened to me!).
Check out the detail on the little sign on the cab windows!  That's incredible!
If that's not enough, check out the 'end car' details! Considering that this is an area of the train likely to be seen even less than the under-side, I'm impressed!
"All well and good" you might say "but given that its a British product, how does it RUN?"  I am glad you asked!  To be honest, it seems to stack right up there with any similar offering from Minitrix, Fleischmann or Kato! Smooth, relatively quiet operation!
Conversion to DCC was relatively easy (NEM 651 socket), although I did have one problem with some lose contact between the motor and the power pick-ups.  This is a not uncommon problem with many locomotives in our scale where the necessary tension that holds one contact to another is just not enough and a little bit of extra effort is required to more solidly secure the contact.   I found (as I often do) some help guiding me to a solution on one of the N Gauge forums.
These two cars are sold as a set, one of the cars is powered and one is a dummy.  I mentioned above installing a decoder for the motor car, but there is a second socket in the dummy car to allow you to change the direction of the lights when you change the direction of the DMU.  I have not yet installed this in my dummy, so you will see both white and red lights on in my dummy car (installing the decoder will ensure that only red or white lights will show in the appropriate directions of travel).  Compare the two above photos with the two below to see the difference.
I actually picked this set up some time ago on a trip to London where I took a Southern Line EMU down to Ford, UK and visited the well-known Gaugemaster shop (right next to the little station in Ford).  It was a great trip, and I would have preferred a Southern Lines EMU rather than the Central lines, it was still a great purchase and a terrific introduction to UK modelling and Farish quality.
I won't go into much more detail, there are several other videos on this model (I recommend NGaugeUK's quite highly - I find his videos to be very compelling temptations to get more UK material!) and plenty of coverage of this model on the N Gauge forums.
That is it for now! Enjoy your summer!  As always, thanks for reading this humble blog, and always feel free to comment or correct my stupid blog posts! Thanks!