2.28.2013

Auhagen Building Kitbash & Installation; Part 2

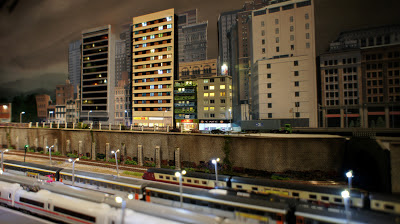
Well, I don't have much in the way of step by step photos to accompany this post, but as you can tell from the photos the Auhagen kit bash (started in this post) is not only completed, but installed!

I needed a corner building for the backdrops, so the overly 'thin' Auhagen kit was a good candidate for some rather generic-looking city apartments over shops/retail.  I dispensed with the original ground floor provided with the kit for my own more appropriate city-style ground floor.
Its hard to tell but I attempted to create the appearance of illuminated letters over the cafe by having the 'CAFE' sign be backlit by LED's from the cafe interior.  Its not terribly succesful, except that if I had done nothing the letters and Amstel logos would be dark!

The technique is to use laser-printable transparency sheets made for overhead projectors (Note: some of you younger folks might want to look up what an 'overhead projector' is as they seem to have been replaced by much fancier computer / LED projectors! :-) ).  Anyway, the trick is to layer several strips of the design (designed in a drawing program on my computer) with the letter areas left 'white': which will show up clear when you print and allow light through.  A final layer with colored letters (and the Amstel logos) goes over the top.  Its a fair amount of work, printing, and trial and error for a result that is only just okay.  I need to work out the kinks on this approach.
The interiors were created with scraps of paper that were originally created for the interior walls of other buildings, but could be used on the ground floors for the 'retail' sections of this building without a problem.  The shop/cafe windows are clear acrylic with more transparency sheet print-outs - this time with window pains and door details.  The rest of the ground floor is just scratch-built with styrene.
In total, this project used the following LED's:
  • One SMD LED on the rooftop to illuminate the advertising sign on the roof.
  • One 6 SMD LED section of LED strip on the ceiling interior to illuminate the apartments.
  • 3 'clear white' 3mm LED's for the Cafe sign back-lighting and the cafe interior.
  • 2 ' sunny white' 3mm LED"s for the Auhagen shop next to the Cafe.
I think this building works really well in the backdrop; it helps to break up the overly uniform appearance of my two earlier facade scratchbuilds in this area, and its height helps to transition from the shorter buildings near the station to these taller buildings behind the terminal tracks.
How about those cool (and cheap!) LED lit cars from China?  More on that in the future!

2.22.2013

The Backdrop Street


A couple of weeks ago, I had to stop working on my Auhagen kit bash to do some work on the 'backdrop street' behind the passenger terminal.  One of the first things I had to do was add street markings (painted on with Warhammer 'bone white' acrylic) and side walks for both sides of the street.
And of course...LIGHTS! I was using my favorite, cheap, Chinese-made N Scale LED street lights, along with some cheap, LED-lit, cars from another Chinese seller on eBay.  At $1.50 each, these seemed worth the risk (but more on these cars in a seperate post).
Wiring was pretty easy as the entire 'roadway' section can be removed and there is plenty of room to wire up the lights below the street.
The above photo is a test of the street lights and lights to the cars.  For some reason, I could not wire the LED's in series with the street lights, which surprised me.  So the cars each got their own 470 ohm resistor and the LED street lights were wired in in series (3 street lights and a 110 ohm resistor).
Additionally, I also added in some wrought-iron and concrete fencing for along the retaining wall/street.  These come in an inappropriate white color, so the iron was painted black and the concrete pieces a concrete-like color.   These would be impossible to construct on the layout, so they were first glued to a strip of styrene for placement.

So how has it turned out? Well, here's a 'before' photo from about a year ago....
 And here is the 'after' photo:
Its hard to pick out the street details from this angle, but I'll have more close ups on my next post with the completion and installation of the Auhagen kit.

2.16.2013

Locomotive Roster: Hobbytrain H2966 SNCB HLE 18


About time Belgium got some love, huh?  Now I just need some passenger cars to go with it   Yes, the video shows the Class 18 pulling a load of freight wagons, which I know are un-prototypical for this class, but until Fleischmann produces its just announced SNCB coaches, I'm stuck with this locomotive pulling freights for a while!  One more crime against prototypical correctness from Quinntopia.  What's new?  Wait! That's no way to start a review!  Let's do this right!
In all seriousness, this Hobbytrain interpretation of an HLE 18 class locomotive of the SNCB was on my want list for a while! It was also a Christmas surprise! Hobbytrain by Lemke, which also has a partnership of some nature with Kato, as well as Mehano and probably others.  According to a comment posted on YouTube with this video, there is a manufacturer in Korea that might be behind Hobbytrain's Vectron locomotives, which includes this one.

In terms of a proper review, most of this is covered in the video, however I'll pull out a few key things here on the blog:

Overall Impressions:
Striking, sleak, and modern looking.  Like the prototype, these Siemens Electric locomotives look contemporary.  What I like about this Vectron-style locomotive is the smooth angles that Siemens used to give a more pleasing, sleaker look.   Hobbytrain's model mimics this well, but there is a glaring and obvious shortcut that Hobbytrain used: printed vents and window hatches on the body.  The below photo shows the printed - rather than molded - vents on the cab.
The below photo, well, most of them, show the forward cab window hatch which is also printed.  As far as I know this may be the only difference that these HLE 18's have from the Siemens Vectron loco's that they are derived from, but I won't be surprised if there are more shortcuts like this.

Paint is well applied however, with no evidence of any bleeding or softness to any edges.  Printing is sharp and legible at a level that I will never be able to read without significant magnification! 
Conversion to DCC and Operating:
Conversion to DCC was one of the easiest I've ever done.  A standard NEM 651 decoder goes into a very accessible socket underneath the body shell.  Removing the body shell was a simple no-nonsense and easy separation of the shell slides with just a slight amount of tension until the engine chassis slides free.
I've spent a little time operating this locomotive, and there are really only two things that come to mind.  The fist is that for whatever reason, this locomotive moves very nice as slow speeds, but then moves up at jack rabbit speeds very quickly (and unrealistically.  You can see a bit of this in the video during the 'Trains in Motion" segment).   I believe this is due to some needed adjustments to the decoder speed tables to resolve.  But as I used a brand new Digitrax decoder I am a little surprised as I've seldom had to make any speed table changes.  If I find a problem here I'll let you know, but for now, I'm assuming its a simple speed table solution.

The second thing is that its a bit noisy. More similar (in terms of noise) to my recent Piko locomotives that the very quiet modern Minitrix models.  Its not bad, just loud.  The motor does give off a sort of high frequency sound that makes it sound like its working really hard.  This may be normal and just more noticeable due to the louder motor, so perhaps not an issue.

Otherwise, the locomotive pulls pretty well.  In the video you will see the locomotive go under a roadway where it climbs a steep 2.5% grade to return over itself.  With the six or seven cars I had behind it, the HLE showed no signs of struggle at all with this grade.  I have other locos that definitely struggle up this little rise, so it seems like this locomotive will be a good puller.
Belgium:
So...why Belgium? Well, why not?!  Seriously, Belgium is yet another European country with a fascinating and colorful rail history.  It has also been pretty well un-served in terms of N scale for most of this hobby's history.    That its unusual to see Belgian N scale trains is a part of the attraction for me!  If you are interested in this, I recommend a site from Belgium which is a part early 20th Century diorama project as well as a pretty exhaustive list of N scale material available for Belgian (most of it is artisan produced).  In the original Dutch here, or a good version of the site in English courtesy of Google Translate here.

2.10.2013

February Layout Update: Backdrops, new trains, and other stuff

Well I had expected to have made more progress on the Auhagen kit bash, but things are slow, slow, slow.  The truth is, the building is pretty much complete now, having finishing the wiring and final details yesterday and today, but in order to place this building on the layout, I've decided to start to finish the backdrop area behind the terminal station tracks where this building will go.
So I removed the two scratch-built structures that I had wired in here and removed the entire street section (it was made to be removed) so that I can add street markings, street lights, holes for other buildings, and various details.

The goal is to get this area to look more like this, and its much easier to do this kind of work on my work bench rather than leaning over the passenger terminal!
But I thought I would share some other 'news' around Quinntopia that I haven't mentioned (yet) or isn't worthy of a full post on its own.

Rivarossi Chapelon:
On what should be some exciting news, I was finally able to get a very hard to find Rivarossi Chapelon 4-6-2 (in proper French designation, it would be a 231E) in the georgeous brown Nord colors.   The more photos I see of this locomotive, the more I think this is one of the greatest looking steam engines around!  So do a lot of other people as these seldom for less than $200 on eBay!  This is a 20-30 year old train!
Back to my model: Its still in its original "DC" only / analog condition and seems to work fine on my little DC test track.  Unfortunately, this is also an example of when eBay can be a bad buying experience.  The locomotive was advertised by the seller in 'mint' condition.  I could tell from his photos that there appeared to be a light bulb showing at the front of the smoke box.  That obviously looked strange, but I bid anyway with the hope that this part might be included with the locomotive in the box.
When I received the locomotive, it seems that calling this item 'mint' was totally inaccurate, even with the photo that did indicate the smokebox cover was missing.  For one,  the blue 'Rivarossi plastic' that this locomotive comes packed in was cracked (not a good sign), as I feared, there was no front piece for the smokebox, and to top it off there are clear indications of where someone had done a terrible job with CA glue attempting to reattache one of the external boiler features (look at the top of the boiler in the first photo above and you'll see the tell-tell shiny residue of CA glue).  ARGHHH!!!  I'm generally pretty easy going on eBay and cut sellers a lot of slack, in this case, tossing around words like 'mint' while also being absolutely unwilling to offer a return, etc...  Well, I gave my fist piece of negative feedback.  This is in my opinion how us buyers can protect each other.  Oh well, I am hopeful someday I will find the smokebox front....

Christmas Trains!
On a much happier note, I recieved three trains for Christmas!    Two locomotives from Hobbytrain; a G2000 in the SNCF livery, and an HLE 18 in the SNCB livery!
 
 I also got a 5 car MicroAce KIHA 261 set! 
All three of the above were digitized and I've been running them around the layout for the past several weeks in preparation for a more formal review (coming soon...I did complete the reviews this weekend, but now I need to edit the content down before I upload to YouTube).