1.29.2012

Alternate Video Location (FLIRT Review)


This is the same video posted below, but its hosted on Vimeo rather than YouTube.  Vimeo allows you to download and does not have the same content problems that YouTube has.  If you already viewed the YouTube hosted version below, then you can ignore this (Its the same video).

1.24.2012

Locomotive Roster: Liluput "FLIRT" ET6.04 RRX; Liliput L163989

UPDATE: Check out Rintiland's blog(in Spanish) for a MUCH better solution for adding the decoder!  No removing of the shell or unscrewing anything!

A nice 'surprise' at Christmas this year was the arrival of this beautiful model of the Eurobahn Rhein Ruhr Xpress (RRX) FLIRT (Fast Light Innovative Regional Train) from Liliput (i.e. Bachmann).  The DB version was released just about a year ago, with an SBB version released last Spring or Summer, leaving me to think that this special livery produced in coordination with Modellbahn Union was going to be forgotten!  However, I got a pleasant email from the shop in Germany where I ordered it almost 18 months ago that it was being shipped to me...in time for Christmas! Whoo hooo!  18 months is a long time in anyone's book to wait, but I have to say, it was well worth it! 

I completed my 'video review' (posted above) which also includes my attempt at installing the decoder (more on that below), but I also wanted to share a written version with photos and such in case the old YouTube connection isn't working for you.

Impressions:
Let me first say that this model is fantastic looking.  Beautiful printing, lettering, and details.  I don't know enough (or anything really) about the prototype to comment on the fidelity of this to its 1:1 inspiration, but given the apparent attention to detail on this model, I have to expect that its reasonably accurate.
What I hope is apparent in the photos is the striking livery of this set in the Eurobahn RRX livery.  The dark grey contrasted with the off-white, and orange highlights really stands out.  The interesting 'digital' design also really nicely complements the sets appearance and I think is one of the best examples of 'design' in contemporary train set livery.

Roof top details also provide a dash of color and some interesting 'texture' to the overall appearance of the set. But its the already installed interior lighting, automatically switching white/red LED lights combined with the overall detail and finish of this model at a pretty amazing price that really sets this model apart for me!

Decoder Install:

There was one small "hick-up" I experienced with this model concerning the decoder installation. I believe it was said nicely by "Putzi" on the Model Rail Forum where the statement was made that the decoder installation is more of a 'medium' difficulty than the 'easy' one I was expecting! Absolutely correct!  And if you've seen the video (and if your in this hobby, I'm sure you can commiserate!) you'll understand a little more of what I'm talking about.  Although its a basic NEM 651 decoder install, getting to the socket is the big challenge!

Honestly, I probably would have broken something if I didn't have this link to a tutorial on the install.

Once you find a nice, protected place to turn this long set on its backside (the cars are all connected - and its heavily implied in the instructions not too disconnect them!) you will need to remove the screw under the 'head' of the cab to remove the front cab 'head' section.  Oh...which side you ask?

Hmmm... I happened to guess wrong and went through a lot of unnecessary effort to open up the side that did not have the NEM 651 socket!  I did later find out that Haltiner Online blog does show you the clue to discover which side has the socket (there is a silver sort of rectangular box on just one end, this end has the socket)
I had some trouble removing what's referred to as the 'head'...until I flipped it around so it was standing right side up then it came straight out.
Your not done yet! Now you need to remove the body shell in pretty much typical fashion.  Although like a lot of the modern models, the plastic seems far tighter than it really needs to be and trying to carefully get the plastic seperated from the chassis is something I could do without!
The easy part...swap the 'dummy plug' in the socket and add your NEM 651 decoder! Whallah! Digital joy is now yours!

Some more cool things about this set:
It might be considered a nuisance to have to keep all four of the cars connected all the time.  But (and I think most of you will agree with this) the good part is that this allows for all the wheel-sets to have power pickup!  Personally, I will deal with the cumbersomeness of lifting all four cars connected together any day if I could get more power pickup!
You know what else is great about this model? The price!  I paid the pre-order price of 155 (figure $200 USD), which is about half of what you would have to pay for anything even remotely close to this from any of the other European manufacturers.  What a value!  The prices seems to have gone up to around 180 - 200, but still a great value in my opinion.
Finally, in terms of operation...smooth and quiet.  Obviously I haven't had it long enough to see how it holds up over time, but its beautiful to see in operation and nice to be able to plant a passenger set on the tracks with all the lights installed! Wunderbar!
So, can you tell that I'm thrilled with this set?  I wish I could say every purchase I have had in this hobby was just as rewarding (and hopefully other FLIRT owners have had similarly positive experiences!).

I'm also curious to see what other liveries Liliput eventually (hopefully?) produces.  It appears that the prototype is quite popular in many European countries and there is a huge list of great looking color schemes to produce for years to come.  This was a very smart move on Liliput's part and I hope that their overlords at Bachmann are rewarded by this investment and continue to produce even more N Scale surprises in the future!

1.16.2012

Kato "5th Avenue" Building Modifications

Finally completed is my efforts to kit-bash three of the new Kato buildings released last year!  I completed the "Broadcast Building" last Spring and the "Office Building" just last month (December), and now the final building in this trilogy, the "5th Avenue" building has been converted into a fashionable department store!  The original building is below.
While at first glance this isn't a particularly extensive change (thus I call it a 'modification' and not a kit-bash!) the work was actually quite complex and required a lot of effort to complete.  This is mostly due to the high number of SMD LED's used in this building (about 20) which each need to not only be wired, but the path for all the wires to get to the bottom of the structure needs to be set so that power can get to them!

A department store seemed like a good idea (they don't need a lot of windows like an office building), and that corner just BEGS for a sign!  This is the same idea already done by others, most notably by the "great Scaper's" conversion of this building to a movie theater.

In addition to the lights, signs, and minor interior details, I also painted the building a light brown/tan color, and gave it a bit of a dark brown wash to help make the building 'pop' a bit more (and of course, the take aware as much of the original plastic 'patina' as possible, although these buildings are provided already painted by Kato!).  The crane on the roof and other details got some paint as well!

Below you can see one of the LED's being inserted through the shell for one of the building's signs.  The l.e.d.'s are from LED Baron.  I glued thin sheets of black styrene as the 'back boards" for the signs.  The signs themselves are water-slide decals printed on a color laser printer. 
I attempted to run most of the wires to the floors and stairwells through the central cavity, however its just not possible to do this with the wires used on the building exterior, so they actually exit the building on the back side and reenter on the ground floor (not pictured).  I covered this external wiring run with some styrene and painted it to match the building.
Fortunately there is little need for a lot of interior details so only a few floors got some basic application of wall-paper and figures.  I did glue together all of the floors (except for the ground floor, which was built from scratch to allow it to sit flush on the layout) to add in the reassembly and re-insertion into the exterior shell.
And after completion, the building can now join the rest of the city...and the slow march to bringing light to every building of Quinntopia continues!
 
Another view of the city, this time showing the previously mentioned "Office building" and the 'flatiron scratchbuild' on the same block as the new "Printemps" department store.
And finally, the last of the Kato buildings is done!  All in all these buildings are fun to work with, but all of the interior floor pieces also make them difficult and cumbersome!  Also, having to working the shells all assembled adds a little to the difficulty!    However, I do think I may need to add another building logo at the top...it just appears a bit too plain right now.  Some jobs never get finished!
So why "Printemps" for the building?  My formula is to basically find interesting stores, buildings or brands that reflect the same countries that the trains represent - and where possible generate good memories of my visits!  So while Printemps is a distinctively Parisian store, it works with the Dutch Blokker, the English HSBC tower, the Japanese Uni-Glo store, Canon building and Sony scratch-build, (also a Japanese Mos Burger which shares a building with a Norwegian Elprice)  and the German (basically!) Faller and  Kibri building.

1.12.2012

Fixing a Loop Problem

 
An area of my layout fairly unfinished is the new passenger terminal area.  As you can see in the photo, there's not a lot happening in this area.  I had an idea for this area, which I'll explain below, but it wasn't really something I was excited about.  As you can tell, there's a lot of space surrounded by a circle of track, and that's my challenge.

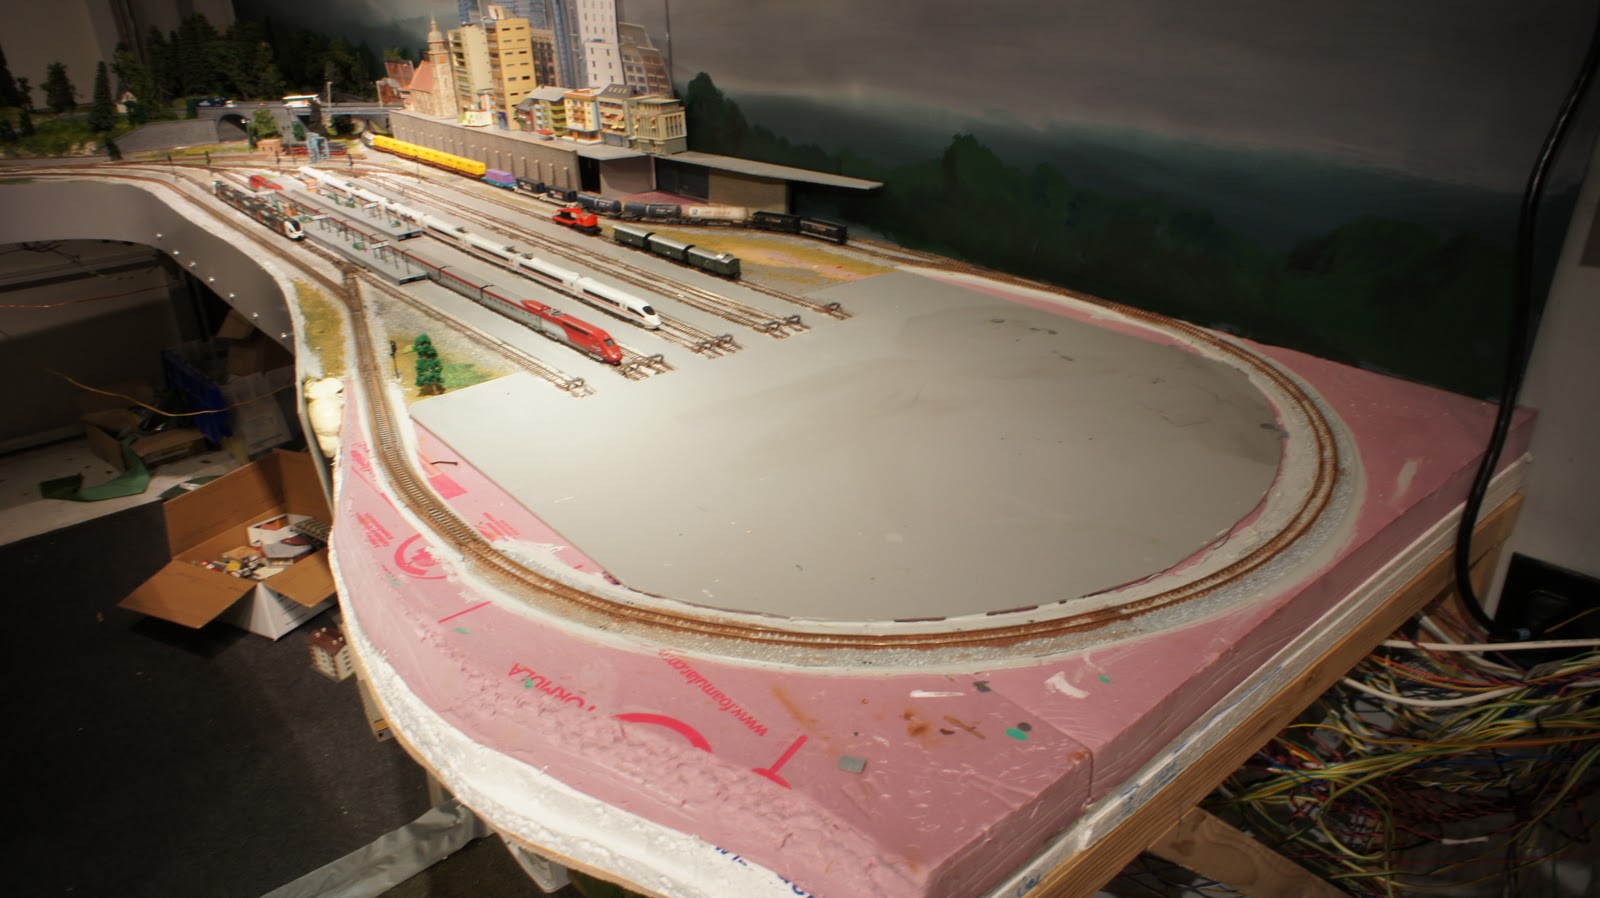
One of the things I've noticed in a lot of layout designs is that they attempt to hide their loops from view.   In a way, I don't like to NOT see the trains that I enjoy running, but on the other hand, the tighter than prototype radii aren't really that visually interesting.  The other problem, and I think the real issue I have with this approach, is that you end up fitting buildings or other scenery inside of a circle, which isn't realistic at all - particularly when your trying to do a lot of urban environments like my layout.

My original concept for this area was to have a road from the backdrop area cross the tracks near the back wall via a bridge, and then decline down to the track grade, where the station and other urban elements would be.  Unfortunately (and like my downtown area), this puts all the buildings, roads, etc...at the same grade as the tracks, resulting in a 'looped in' area of buildings.  I already have this 'feature' on the downtown section, so I wasn't thrilled with repeating this.
My second idea was to elevate the station to be at the same grade as the background buildings, which elements the awkward decline after the bridge to the statin area, but would require a retaining wall of sorts between the track and the elevated urban area.   The disadvantage with this approach is that the urban area is still stuck in a 'circle of track' although it would be a bit more improved given the retaining wall.
What I think I like the best (and hinted at above) is to cover most of the loop...this removes an uninteresting curve view of the trains, but has the benefit of allowing me to do a much more interesting urban area in and around the passenger station.  The track will be open and easily accessible from the side underneath this area as well, so cleaning and maintenance will not be a problem.
The big drawback with this solution is that it would be very difficult to access a switch on the far side of the layout that leads to a siding along the back wall (since it would be covered with the elevated streets and buildings).  I believe that every turnout should be easily accessible as  possible, and even with some creative engineering, getting to the switch for cleaning or troubleshooting would still be a hurdle.
The solution to the switch location problem is...move the switch!  In fact, there is enough space (and I have enough excess track sitting around) to actually double-track the whole curve and allow access to the long siding (and make it LONGER!) by placing the switch (potentially a double crossover) up to the front of the layout.  The red line below shows the new radius....
This solution I think is the best of all worlds.  I'm not thrilled with adding too many switches in highly visible areas, but I do like the fact that I will have a very long siding now, and I will have a good footprint to work with for the area surrounding the passenger terminal.

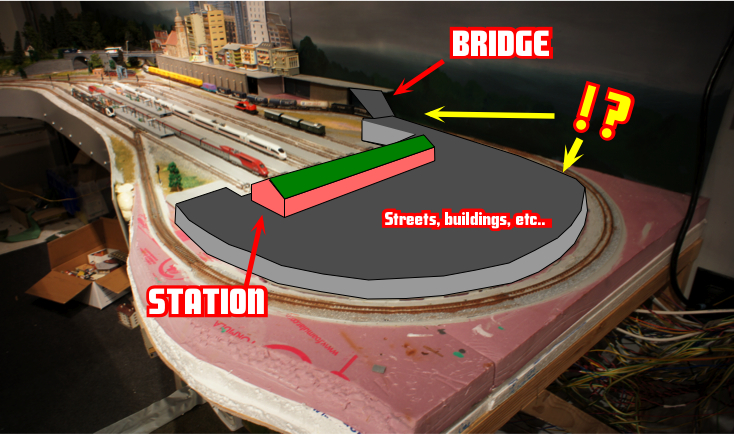
This will be the final part of the layout to get some finishing done to it, and I'm excited to get to work on the passenger terminal because I think it will be interesting to work on.   Its funny how the right 'solution' for a layout sometimes requires that you do nothing for awhile until you get to the point where you know what you want to do!

1.05.2012

Locomotive Roster: Kato TGV Sud-Est; Kato

Some may call this cheating since I already discussed my TGV Sud-Est from Kato back when I had it digitized last May, but I never did a proper 'review' of it and I thought it was a set that deserved some additional coverage!   It also happens to be one of my favorites, so its not surprising that I like to talk about it more!  It also provides a good excuse to share a few more photos of this angular, iconic, orange beast on the layout! 
On the viaduct....
Passing by the yard....
At the throat of the passenger terminal....
Of course, the video above goes into more of a traditional review if your interested in that sort of thing! Thanks for reading!