STEP 3 (Plus Lighting)
Welcome to Step 3! (Willkommen!) So Step 3 is technically both easy and short, but this is sort of the 'last chance' to add lighting, so I'm going to tell you what I did to add lighting to this building.
Before we get too far off track, here is the original German instructions for Step 3:
3. Die weisse Bodenplatte Ec des 2.OG wird jetzt auf die
Untersichtplate deckungsgleich gelegt unde leicht fixiert. Auch hier mussen die Kernöffnungen
ubereinander.
Machine translated English:
Third The white bottom plate of the 2nd floor is now set Ec congruent to the soffit plate ande easily fixed. Again, the core holes must superimposed.
So basically what we're going to do here is start adding the floors, beginning with one of the two 'special' white, circular pieces that act as the bottom and top of all the floors - or as the instructions seem to describe them: the "Soffit Plates"
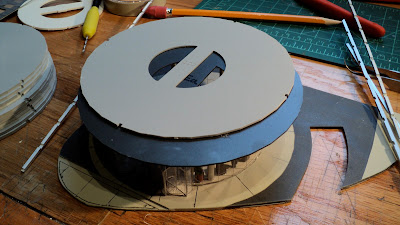
The below photo shows you what we're doing. The top piece (painted a light grey rather than the stock white) is resting on top of the ceiling section of the ground floor lobby that we attached in the last step.
Note the semi-circle holes in these sections which MUST line up!
What I also needed to figure out was how to wire this thing. There doesn't appear to be an easily accessible cavity for the wiring, so the only choice is to create my own holes in an area that won't be conspicuous.
I decided to make two small holes in the area between the central elevator / core shafts. You can see the holes below in the piece on the right next to the yellow hand drill. I marked them slightly off- center (to ensure alignment is consistent as each section is added) and then pre-drilled the holes.
Another important consideration at this point is interior detailing. So I pretty much stopped working on the building and sliced up a lot of pieces of styrene, glued them together, painted them, and had a bunch of 'office cubicles' ready to apply to each floor as it was installed.
Back to lighting, I decided to light about 11 or so of the total 26 floors in the building. Most floors would get two sets of 3 LED SMD strips. Some floors would also get a third set of LED's just for variety.
Below is a photo of the ceiling of one of the floors to get 3 sets of LED's. Note the wire, which I attempted to solder with as little slack as possible to avoid getting snagged on anything and to not be visible.
I also added several LED strips into the interior of the lobby section that was already glued together. Poor planning on my part actually as I should have done this in Step 2 as it would have been a lot easier. Anyway, you can see the leads from the 3 LED strips streaming out of the top in the below photo.
Finally getting things where I need them for the lighting, section "Ec" is then given a bit of glue and then applied to the top of the black ceiling of the lobby. Make sure the semi-circles are aligned!
Back to lighting again....there's an old (and likely dangerous) method of wiring houses here in the USA called "Knob and Tube" wiring. I kind of take the same approach with distributing the power for the lighting of this building (used the same approach for lighting the "Skynet" building as well); what I do is run two brass rods through the holes I drilled (see above) and therefore have a 'bus' of both positive and negative electricity running throughout the building. I don't know if this is safe or a potential fire hazard, so before you do anything stupid and follow my advice, you should check with an electrician that knows better than you or I.
This method is very convenient for soldering the wire leads from the LED strips on each floor without having to run a billion wires through each floor.
And that is a wrap of Step 3! Next...Step 4!
For reference...
Here is Step 0 (Preparations)
Here is Step 1
Here is Step 2


Using two brass tubes as an in-building power bus should be perfectly safe. First, you're dealing with 12 Volts, and second they're inside the building and can't contact anything unexpected and cause a short or give anyone a shock. That assumes you've used a fuse on the output of your supply.
ReplyDeleteAny wiring (even 12V) is potentially hazardous if not adequately fused (i.e. with a small fuse with a lower current rating than the ampacity of the wire used). The ampacity of a chunk of solid brass should be much higher than a thin wire (brass is about 1/4 the conductivity of copper, but there's a lot of brass in even a small tube), so it's never going to be the weak link that melts in a short circuit.
Thanks Ken! That's very reassuring!
ReplyDelete