12.21.2016

ROOFING THE STATION

Hello World of Modelling Fans!

I apologize for the dearth of posts lately. Its been freaky cold in Quinntopia (the garage where the layout is) and work has been super demanding. The combination of the two means slowwwww progress.

But that doesn't mean NO progress! I've been building a roof for my station!

I started with some laser-cut trusses from Luetke Modellbahn. There are too long, so some editing was in order.
 I measured the dimensions of the station to determine the even distribution of the trusses and rough sections...
 With the correct dimensions established, the trusses are laid onto long strips of styrene to form the roof (and the place to attached the LED strip).
 With the too-long ends of the trusses trimmed, and a bit of glue, a test fit was in order....
 Now to add the roof itself, paint, and the lighting....
But for that...you will have to wait for my next post! Thanks for reading!

11.26.2016

STREETLIGHTS AND LIGHTING BUS

With most of the sidewalks and street markings complete in the Commercial District and station area, I am now adding street lights! Below is what they look like ---without power!
I'm using very inexpensive, yet surprisingly good-looking LED light posts from We_Honest (and others) from China, available on eBay.  They are straight LED's without resistors, so you can't just hook them up to your accessory output - you need to add resistance.
However, one of the challenges with these lights is that the wire connectors are a very fine gauge - maybe 30 AWG or so? Pretty difficult to work with - particularly after being threaded through the layout and working over your head under the layout.  The goal is to speed up and minimize the time and effort connecting hundreds of wires under the layout.

My solution to this is to create a 'lighting bus'.  This is simply a thin, narrow material using copper tap (or somethings bare copper wire) attached to both sides.
The resistors are added to one side (I'm using 470 ohm resistors - you can wire these lights in series with lower resistors, but its actually more work to connect these tiny wires than just attached each light separately to its own resistor).
Then these strips are hung or attached underneath the layout parrelel with the streets and the wires from the street lamps.  Now its just a couple of quick taps with the soldering iron to soften up the solder and attach the wire tips and their bare wire leads.  Voila! Done!

In addition to street lights, having this wire bus also makes it easy to add lighted cars.  As you can see in the below photo!
I'm working out from the Station area towards the Commercial district: Below is looking up the Avenue of the Liberation of Quinntopia towards the Commercial and Residential areas.
Piko Street passes under one side of the station and connects Avenue of the Liberation of Quinntopia towards Minitrix Avenue and then onto an end where it does a hard right and turns into Kato Avenue.
 Next! More lights! Once the street lamps (and cars) are installed, then buildings can be placed.


11.20.2016

MAP OF NEW QUINNTOPIA!

As the municipal electrical employees begin to add street lights to New Quinntopia (having completed adding all of the necessary street markings last week), the city planners have published their first map of the street layout of central New Quinntopia!

The central area of New Quinntopia is currently laid out in three sections.  Below is an overview of the central area with some of the key features:
Starting from the left, there is the undeveloped industrial district, which may or may not have factories:
Next to the industrial area, and bordered by the QMT (Quinntopia Metropolitan Transit) line, is the Commercial District. This is the area where the main QMT station is located (Latveria Station) along with many office towers and hotels.  Planning is underway for the intercontinental railway station Gare de Quinntopia. Which will be completed someday. Probably.

On the right side of the Commercial District, the elevation grows and clusters of houses and apartment buildings dot the hillside.  This area is also currently undeveloped.  There is some concern from city planners that the ground has a strange pink appearance and is very soft.  Outside consultant assure future residents that layers of a new environmental solution called plaster will cover up the toxic and unsightly mess. Everyone is happy.
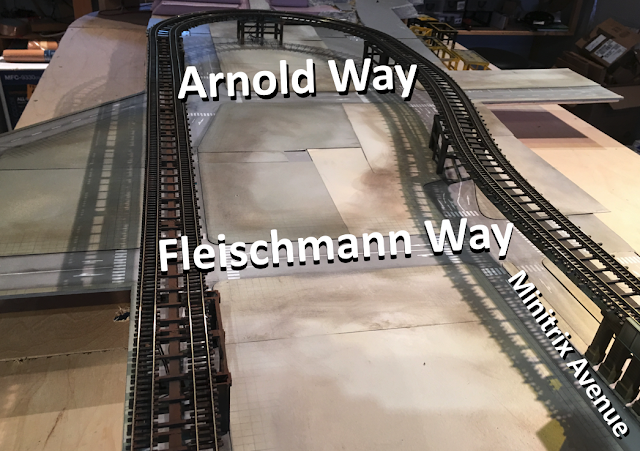
The City Planners have also given each street a distinctive name.  The below images show the city streets without the QMT elevated transit overlay.  As you can see, Latveria Station faces the Avenue of the Liberation of Quinntopia (named after a famous battle that took place in Quinntopia).   On the opposite side of the station is one of the main thoroughfares of central Quinntopia; Minitrix Avenue. The station is bounded by Piko Street on the left, and Tomix Street on the right.  A very narrow street - Roco Street - bisects the block opposite the station.

Moving to the right of the station, we see that Minitrix Avenue continues, while the Avenue of the Liberation of Quinntopia turns into a one lane road before ending at Fleischman Way - where the future train station will be built.  Parallel to Minitrix Avenue is another major roadway: Kato Avenue.  Here in the heart of the commercial district both Minitrix and Kato avenues cross Fleischmann Way and Arnold Way before they continue on and merge in the residential areas along the hillside.
Unfortunately, New Quinntopia is not a great destination as no one road yet known to us actually leaves New Quinntopia; so if you get there, you may never be able to leave!

11.13.2016

STREETS & SIDEWALKS

The very tedious process of creating sidewalks is finally nearing completion.  The process I've come up with takes several steps, so it's been...well, tedious!
The good news is that I am now moving on to much more interesting steps.  Namely, the placement of street markings!  This is another somewhat time consuming step, but when its all done it will be worth it!
Once I have all the street markings down (almost there!) I'm going to weather the streets with some weathering powder, and then apply a flat clear-coat over the whole mess. Once that's complete, I'll add street lighting and then the buildings are added!
The last time I create street marketings was six years ago, and I used a similar solution: dry transfer decals.  However, my experience last time led me to prefer the dry transfer decals from Japanese company "TGW".  The Busch are nice, the Faller are difficult (but that might be because they are old and the decals have dried out?) and Woodland Scenics leaves too much glue residue. I ordered the TGW street markings from Hobbysearch Japan.  While not perfect, they apply really well and don't have tendency to crack or break as much. I had to trim the crosswalks to avoid a specifically Japanese style, but this was just a minor step.

And like I said....soon the buildings are coming back! Here is my jam-packed workbench with most of the large structures out of their storage boxes! Soon!


10.16.2016

SIDEWALKS FOR THE CITY

The new layout slowly develops...currently my focus is on arranging the city, which is defined by the placement of roads and sidewalks.  This is both fun and somewhat complicated; it's nice to try different placements of structures, but also complicated trying to allow for somewhat realistic looking streets and placing buildings so that they look right when lined up next to each other.

For my previous layout, I used styrene sheets for the 'sidewalks/city blocks' (see here), which was adequate. However, styrene sheets are somewhat expensive for this role and are a little difficult to cut. This time I am using card stock.  I paint it with a 'Dark Aircraft Grey', and then using a pencil add gridlines and then some weathering powder to 'dirty it up' and then finish up with a matte coat of spray paint:
In another new method, I'm actually glueing the sidewalks to the streets. Previously they were held in place by the streetlights, but since I''' me using a different type of streetlight this time, I decided to permanently affix the sidewalks to the street base using contact cement:
 The advantages of both the cardstock and applying the sidewalks with contact cement is that the sidewalks now have a more realistic looking lower profile, and they now always sit flush to the street itself.
As I mentioned above, building placement is a tricky thing.  I have small buildings, old buildings, new buildings, tall buildings, apartments, offices, retail, etc... so trying to combine them appropriately so it appears to be how a city could naturally evolve is kind of a challenge.  There's a certain commitment level to it as well since the sidewalks are basically designd to fit a certain group of buildings.

I say all that to point out that my next blog post with any visible updates may take a while! So in the meantime, thanks for reading and check back soon!

9.04.2016

THE METRO IS RUNNING!

Finally! After months and months or planning, building, delaying and so on, we have activity on Quinntopia again! Whoohoo!

Here are some 'action photos'...

On the girder section approaching the station...

On the high extension over the main railway right of way....
Another angle...this portion of the structure was complicated to build as each of my elevated sections is meant to come apart, and also need to be level, stable and look good (while also allowing for four or five tracks below!)
 This shot sort of shows the entire loop. Ultimately you won't be able to see the entire loop as much of it will be blocked by buildings!
While much of the time was spent trying to figure out how to scratch build an elevated trestle system, an equally large share of time (and money!) was spent trying to figure out how to automate DCC equipped trains so that they automatically stop, wait, and then depart from the station.  The solution to that problem came from the Viessmann 5208.  This is an automatic timer unit that connects to insulated rails (a total of four blocks) and allows for automatic detection, stopping and then acceleration.
I was curious about how this unit would work with my Digitrax DZ-125 Equipped Kato Ginza Line Metro, and it does seem to work just fine! Although the 'crawling' section' portion does not feature the deceleration proposed in the items feature lists, which may be due to the decoder (more on this later). These units are not particularly cheap (about $80) and will only operate on one track, but compared to  upgrading to a Z21 or Viessmann Commander or ESU ECOS, these are much more affordable options at this time.

Now that I've proven I can get train automation to work, I need to get a second 5208, another 'metro' train (I debate whether I should go for an identical or similar Kato Ginza, or something a bit more 'vintage' looking...any suggestions?) so that the elevated line has real 'action' with two trains running in opposite directions!

Then I can finish the station - platforms, roof, lighting (you can see the electrical leads for my eventual lighting of the station interior in the video!) and then start mapping out streets and building placement! And then, and THEN...its on to laying down track for the 'main' railway lines!

7.31.2016

ELEVATED TRANSIT ALMOST READY!

The elevated Metro line is almost complete: All tracks and elevated structures are done with soldered leads, color-coded drop lines, rust painted rails, and flat black base coat.  The only thing actually keeping me from running trains is that I still need to add track to the station and wire everything up....
With the basic form of the elevated line now established, I can actually start to move on to other areas....like setting up the actual city and the main rail lines! But, not so fast...
First, all of the elevated structures have come off the layout for two reasons - one additional pass with the airbrush to add a bit more color to the side-wall girder sections (whatever they are called) and to also lay down the sintra material I decided to stick with for my streets/city underlayment. Unlike with my last layout, I felt my city streets were too 'black' and decided to go with a grey color this time (I think it looks more 'worn' and has a slightly older feel).

In addition to the 'flat' city area, my little hill on the north end of the layout is getting straights laid across its terrain!
In my next post, I hope to have the final paint for the elevated structures complete, and have the elevated section completely operating. I have another 'automated stop' device that I will be testing as well. So stay tuned!

6.28.2016

LATVERIA METRO: 75% COMPLETE!

A major mini-milestone has been completed! The base for the Metro station is done and the overall station is now 75% complete! What began seven months ago as an idea to do something more classic than the Kato Suburban Station is finally nearing completion! Behold! The Latveria Metro Station!
In addition to the four Walthers Northern Light Power Stations, the building also uses Greenmax Concrete Viaduct Piers as accents.  The only item surviving from the Kato station is the stairway shown in the above photo.  The above is the 'front' entrance' with a wide pedestrian arcade or entrance...

Above is the rear of the building.  Not much to say. I had hoped to NOT have to build a rear to this building to save both time and money, but no better plan presented itself for what to do on the back side, so another long cycle of cutting, gluing, etc... took place.
Another shot of the front of the building. The ground floor is lit with LED strip lights. I used two different colors...a 'white' LED for the common/public areas, and a warmer color for the interior shops.
One of the major challenges to get to this stage was determining what to do with the interior facing walls of the train area.  Just painting the plastic would not look good. I thought of adding a thin styrene facade, but the idea of cutting out 40 windows was not something I was looking forward to. Fortunately, paper seemed like a good idea, and the website paperbrick.co.uk has a great tool for selecitng and printing multiple brick patterns. What a cool tool! Made my day. Above is a photo of the printed brick patterns being trimmed to fit the interior walls.
Now that the foundation is complete...I can work on finishing both the elevated metro track system and the platforms/roof/interior of the station. That means we're actually getting closer to running trains!

But not so fast...I still need to figure out how to automate the station stops for the metro trains. After futilely working with some non-conventional items, I am convinced I need to put on the big boy pants and go with a Loconet system / DCC / Computer (or Command Center) to automate these trains.  It seems the only really effective way to make it work.  Yes, SOME of you tried to warn me of this several months ago...I get it! You were right! :-0

And with that...see you next time!

6.18.2016

MISHMASH UPDATE

Quick updates!
Painting continues on Latveria Station! I need to get the exterior painted, interior detailed, and lighting added so I can add the station to the elevated metro loop so I can start to assemble the city and then add track for the rest of the layout.  So this one little (well, not so little actually!) building is the lynchpin upon which all future progress rests!

Below I am starting to add walls for the ground floor of the station....
And in the photo below you can see that more color has been added.  I still need to tweak the colors a bit more and figure out what exactly I am going to do about the windows on this station, but it is finally starting to look like a structure!
As I mentioned above, the elevated line is a key foundation for the layout, and in the section where it swings out over the main line I needed to scratchbuild my own elevated trestle so it would look realistic (which is not the same as prototypical!).
Here's another view of the girder work on the elevated section. I was a bit concerned with how this was going to turn out, but I think its going to look allright.