12.30.2011

Kato Office Building Kit-bash

My holiday project this year (well, one of them, this is about the only one I got finished) was to kit-bash and convert the Kato 23-438 "Boutique and Office Building".   I've had two of these buildings for a year and a half and it was past time to get them done!

The idea was just to increase the height...nothing too fancy.  It did require losing two of the bottom floors...
And the removal of top fascia (not sure what its called) from the other building...
These buildings come built, so rather than chance doing more harm than good, I left the building sections together for my kit-bashing and in fairly short order had the basic look of what the building was going to look like.
While each floor of this building is provided (albeit without any detail), the bottom floor was another challenge.  Typically, I'll just toss out the bottom floor, but this time I tried to preserve some of the important pieces (mainly the 'walls' that hold up the floor above it, and the nice looking stairway feature).  My method was to grind the heck out of it on my belt sander!  Luckily, this un-conventional approach worked!  Its a bit crude, I admit, but now I have pieces that I can remount onto a smaller, thinner sheet of styrene so that the ground floor of this building sits level with the rest of my structures.
For the intermediary floors, I decided that the bottom four floors would be 'retail', while the remaining upper stories would be offices.  Below is another application of using home made images (actually, gathered from the old internet) to be glued to the 'walls' or strips of foam core depending on where things need to be placed.  Here are the images I used for this structure (same as my 'Kehl/Blokker' building project from earlier this month).
Once the images and various pieces of interior detail were mostly in place, I added the light strips.  For this building, I used the SMD on light strips available from many sellers in China.  Their cheap and relatively use to place (although you need to cut them and solder them to use them in shorter sections) .

I wasn't sure about how to proceed from here...do I glue each floor together and then have a complete interior section to slide into the exterior shell? Should I add each floor one at a time? Use adhesive or not? Ultimately I decided on the first option, and for the most part it worked out.  Below you can see the result before installation.
After sliding the interior floors (with all the LED's already wired and ready to go...you can see the leads at the bottom of the structure in the below photo) I had to replace the building 'glass'.  Getting the interior floors into the exterior 'shell' was a bit of a tight fit,  and some of the floors needed a bit of reduction with the Dremel.  The exterior sections have bracing on the inside to help form a stronger bond between the two sections, which however reduces the space where the floors would go!
So..wallah!  Complete (pretty much)!  The top floors are offices for the "Weyland-Yutani" corporation, and they even have their corporate logo on the top of the building!  Interior details are a mix of homemade cubicles and bits collected over the years.
The lower floors are retail space for "Saturn" (a real retail chain that I ran into in Hamburg, I liked the look of their logo and the store I visited sort of reminded me a bit of this building), so all the original "HWV" branding that Kato nicely provides was, unfortunately, removed.
Installed on the layout, this building sits next to the 'Canon' office building, representing the modern high-rises that have taken over this part of the city (with only the church and its small plaza across the street the sole reminders of the older time sof this area of downtown).
And therefore, my work for 2011 is done!   You can see the last of my Kato buildings just to the left of this one in the above photo.  That's the next project and will be my first for 2012!

Finally, Happy New Year and Happy Trains! 

12.26.2011

Locomotive Roster: NS Koploper; Minitrix 12749 and 12865

UPDATE: Please read this newer post which updates some of the info in this review!

Taking a small break from reviews of my French fleet of trains, we'll now turn our sites to the northeast of France to the Netherlands!  In particular, Minitrix's model of the Nederlandse Spoorswegen "Koploper" Electric Multiple Units!  Actually, I believe the official designation of these trains is ICM (for Intercity Materieel), but I think most people refer to them as "Koplopers".

If you've seen any of my videos or photos on this blog, then you will have seen these trains appear quite a few times.  I have two versions, the 12749 in the traditional blue and yellow of the NS from 2004:
I also have a slightly older model from somewhere between 1994 and 1999 in the light blue KLM advertising livery which is also packaged in the older Minitrix boxes before the Marklin acquisition:
Despite the fact that both models were produced between 5 and 10 years apart, they both appear to be identical except for their paint schemes and the packaging.

What surprised me was that the KLM model (when it was produced is not quite clear to me, but the packaging very clearly makes it certain that it was pre-Marklin acquisition in 1997) has an NEM 651 interface.  This seems amazing as we're talking about mid-1990's production with a plug and play socket for a decoder! If that's true, then this must have been one of the very first models to be so equipped!
I suspect, though can't confirm, that the recently released (and still available) version of this train in the Olympic livery (model 12184) is basically the same as well.
Despite being an older production model, in some ways it lives up to contemporary standards.  The details and printing are crisp and clean, the models feature white and red lights for both directions and, of course, the NEM 651 interface for easy (usually) conversion to DCC.

What's not so good is that these units appear to use an older type of can motor (although it does have a flywheel) that seems quite noisy compared to more modern production.  Additionally, only two axles are powered.  While these are provided as 3 car sets, you may not need too much traction or power, but I expect that on a significant grade, these might struggle a bit (I have 3% grades on my layout and have not noticed any problems yet).
 
 There is more detail and additional information on these two sets in the video above.  Thanks for reading!

12.24.2011

Merry Christmas from Quinntopia

Its not really a white Christmas here in Quinntopia, but the Tomix Nanbu-Jyukan's looks so cool in the snow (no pun intended). 

Christmas Eve in Quinntopia is much like anywhere else...the streets are still busy with last minute shoppers...

Parking is scarce on this chilly afternoon as those final gift selections are made....

Some crazy people ignore all of this, and spend their Christmas Eve creating a quick winter diorama with flour and some old track.  A non-running Minitrix NS 1100 was originally the subject but, alas, without cantenary, this pictures' quite sad.
So the brightly-colored, diesel-powered motor cars of the Nanbu Railway are the chosen power to take everyone back to their homes.  They show up nicer in the photos and, apparently, even some wild horses will stop and stare!
This post makes little sense, but then neither does a grown man like me playing with toys!  But what better time of year- and what better way to spend the years in between- than playing with toys...and sharing with friends!

Merry Christmas Everyone!

12.19.2011

Kibri 7402 "Bahnhof Kehl" Kit bash: The "Kehl Building"

I've been working (for what seems a very long time) on a kit bash of one of the coolest looking older structures out there.  The focus of this kit bash is Kibri # 7402, which is called the "Kehl Station."  The above photo is what I won on eBay two years ago, and then last year I picked up an un-built kit as well.

The kit in the the original box looks like this - which seem to be quite rare and hard to find (it wasn't very easy for me to decide to finally use this kit, but I decided I don't wan't to become too much of a collector rather than a modeller!):
Although the original kit is composed of a very long station and a tall office tower section, I was mostly interested in the opportunities that the 6 story high rise section of this station provides.   I was fortunate to find an unbuilt version of this kit and a built up section of the office tower which are the basis for the scratch-build.

Kibri produces this same station in HO scale, and also produced a similar station with the product # 7400 (see box below) which has a much smaller office tower.
Although the original kit is actually one very long station, I was mostly interested in the opportunities that the 6 story high rise section of this station provides.

So I started with the painful (and not recommended!) task of trying to dissassemble the old kit. Lots of pieces get broken (the corner edges, the window frames, your patience, interest in the hobby, etc...) which later had to be repaired or covered up.  When I was done, the parts looked like this:

I then had to figure out a plan to do the best job of 'merging' the old pieces with the un-built kit:  This requires a lot of carefully cutting (using both a razor saw or hobby knife) and careful gluing. 
 
For the ground floor I need to do something different as I didn't feel the original office tower ground floor would look right for a separate building.  I re-purposed some of the pieces from the un-built Kehl station kit and was able to use them to create the ground floor windows and doors:
I decided to take a bit of a short cut with this building and not add interior details for any of the upper floors.  The ground floor however would need a nice looking shopping look.   I decided to create my own using strips of foam core and some self-created images and graphics of grocery store shelves. If you'd like a copy of my shelves and office backgrounds, its available here to download in pdf form.
 
Additional preparation was required for the store and building signs.   I typically use a combination of LED's, strips of clear, thick acrylic plastic (a pain to cut!), self-printed water-slide decals and even laser printed color transparencies!  Whew!  A lot of work, but the extra touch of having illuminated signs is important to me (if your curious about some of my LED wiring techniques, check this post or this post).   The below shows the vertical sign with two SMD LED's on the top and bottom almost ready for attachment to the building.
I added some extra interior bracing to make the building as square as possible, and used some very dark window tinting materiel for the windows.  The below shows the back wall.
The below photo shows the front and back sections almost ready for final assembly.  Note the rather quick and easy lighting method used on the building section shown on the right.   Its merely a long strip of SMD LED's that come pre-wired on an adhesive strip (available on eBay for decent prices).  As it turned out, its a bit dimmer than I wanted...my original fear was that it would be TOO bright, so I added piece of plain white paper behind the tinted windows to block unsightly views into the building shell and 'dim' the light a bit.  It dimmed it too much. It still works, but a minor disappointment in retrospect!
And...wallah!  The completed "Kehl Building"!

The store on the bottom floor turned out really well I think ("Blokker" was my choice....based on a prototype out of the Netherlands.  I liked the name and the logo!). Which is interesting, as this was realtively easy and inexpensive to pull off (the figures in the store are some of the cheap Chinese ones mentioned here).
And here it is on the layout...I have nearly a full street lit and complete now!  You can see how relatively dim the lights are for the upper stories, but it works.
This wasn't the original location, but I think it works well on this corner.
A close-in shot from another side:
Okay! Another building done! Whew! This took a while, but its always a nice feeling of accomplishment when its placed on the layout!  But now I can move onto another one!

Thanks for reading!

12.15.2011

Locomotive Roster: SNCF BB 15000; Minitrix 12134

At the risk of starting to be predictable, here is yet another video review of another French locomotive.  This time around its the iconic 'broken nose' of the BB 15000 series from Minitrix.
Not only does this locomotive have that iconic "Nez Cassés", it also features one of the most interesting and dynamic liveries ever to grace a train.  The paint scheme (and locomotive as well) was designed by Paul Arzens, who was an important industrial designer and a true ground breaker in that field.  Apparently the idea for this paint scheme is to incorporate the idea of a sprinter at their running blocks before they start their run.  Somehow it really works for me!

These models from Minitrix are still easily available and are a great value.   You can often find them for around $100 USD and feature terrific operation, great detail, and easy conversion to DCC through the NEM 651 interface.
 This design also made it across several borders, including the NS Class 1800 (which I covered here).
 
Anyway, I hope you enjoy this video review! Please feel free to leave a comment to share your knowledge and correct my ignorance, or just say 'hi'! Thanks for reading!

12.12.2011

Miscellaneous Details from China via eBay

Most of us modellers are always looking for cheaper solutions to accomplish more with limited funds, and a lot of new stuff to seemingly allow this seems to be offered from China these days on eBay. No matter what country you are from, these inexpensive alternatives from China seem to be available to every country.

I've bought a few of these myself over the past year or so, and I thought I would share my opinions on them with everyone else.

LIGHTS:
I've bought three different types of lights from China, one of them by accident!  The three lights shown below are all from China, the two on the left being LED's and the light on the right using traditional incandescent bulbs.
The dual light LED lamppost below was something I mistakenly ordered (don't ask!).   It might be a little obvious in the below photo, but they are much too large for N Scale.  They are LED's (the bulbs seem to be 3mm LED's) are a nice warm white, and have the resistor already soldered in below the base of the lamp post, so they are ready to connect to your 12volt power supply.   These were purchased from Xinsai Brakepads88 store on eBay, and they are labelled as "H12 75mm warm white LED" lamp posts.  For an HO layout, I think this would suffice.  Quality is okay, nothing special.  They cost around $1.50 USD each.
 
The below streetlights are the T92 HO and N Scale 45mm LED street lights.  These are pretty good for N Scale (Potentially a bit smaller than some other traditional brands version of street lights) but would be way too small for HO scale.  These feature a white (blue-ish white) SMD led rather than a bulb, and look really nice.  Unfortunately, you'll have to solder the supplied resistors to the 'bare' copper wire (which then connects to the negative power of your 12v DC power), so a little more work is required with these.  I ordered these from seller everestmodel, and they cost about $1.50 each as well.  I like the look of these a lot, but next time I will order the 5cm versions for a little bit more height.
The platform style lights below use traditional incandescent 'grain of wheat' type of bulbs rather than LED's.  Interestingly, the entire assembly is spray painted with black paint, so when power is first supplied to the bulbs, a bit of smoke rises as the paint on the hot little bulbs burns off!  The quality on these is not that great..the bulbs are soldered to a flat piece of metal that acts as the lamp post cover, and the connections are weak.  I would avoid these.  I've installed some of these on my layout, but they are place holders until better alternatives are found.  These are sold by cnmodelnt and labelled as L327 5.8cm 12v lamp posts.
Here's a photo of the above lights installed on my platform. They look okay...the bigger challenge for me is getting the darned things to all stand up straight! Arg!

TREES
One product I've really enjoyed from cnmodelnt is their Dark Green trees!  Below is the D9035 (9 cm) and the D7027 (7cm) trees in dark green.  The 7 cm version are about $0.50 a piece, while the 9cm is closer to a dollar.  The 7cm trees are okay for a small, growing tree, but seem to small for my tastes for something meant to represent a more mature forest.  The 9cm version is much better at representing a more mature forest area.
The below photo shows the 9cm version next to a train so you can some idea of the relative size.  Not too bad. As trees go, I think these are pretty good, but their general uniformity might look too fake if not broken up with other trees of different size and color (representing different species for example).


STATUARY?
One thing my urban environment has been lacking have been statues!  I know a lot of modellers used various figures from war gaming, and this was my intention until I came across these.  Also from cnmodelnt, these are labelled as DS04 Resin Sculpture Statue figures for HO and N.  As the below N Scale figure shows, they may be a bit on the large size for N Scale statues, but I think they will serve just fine.  The below photo shows them painted in a primer coat of black, awaiting some final coloring by hand before they are added to the layout.  Again, these ran me about $1.00 a piece ($13.99 for a pack of 14, with apparently no duplicates) so a pretty decent value I think.
FIGURES
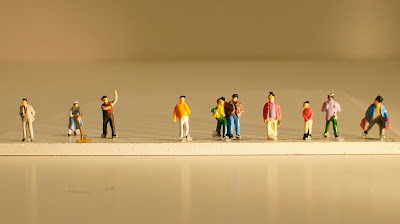
What about the little people? You know, those little plastic figures to help populate the layout?  With quality figures from Woodland Scenics or Preisser costing quite a bit, populating your little metropolis can be quite expensive. Fortunately these cheap figures from seller wehonest  are about one tenth the cost ($0.10 a piece) can help to fill in those empty sidewalks.  I bought a package of 100 for $9.99 labeled as having 19 different poses.

For comparison sake, the three figures on the left in the below photo are from Preisser, while the figures to the right are the inexpensive Chinese imports
 Close up details on the Chinese figures reveal a rather disturbing level of facial disfigurement - this couple was made for each other!
This chap has what appears to be one of those samurai pony-tails.  It looks pretty spiffy with that magenta jacket, I must say.
And for comparison sake, the rugged, handsome profile of this gentleman from Preisser:
Obviously, the quality of the painting and details are nowhere near the above mentioned Woodland Scenics or Preisser figures, but they are acceptable in my view for populating building interiors or scenes in the distance where details can't be seen anyway.  And at $0.10 a piece, this is certainly a much funner option than the inexpensive, but unpainted, bulk packages from Preisser! So I'm very glad for this cheap, efficient option for population expansion!

That about sums it up! Hope this was in some small way a helpful guide to help you with your layout scenery decisions!