7.14.2013
A Faller-inspired Kit-bash - ALMOST DONE!
The Faller-inspired Kit-bash is almost complete, and I actually hope this will be my last post on this project so i can move on to other things! Its not completely done, so I'll mention those remaining tasks in the below pictures.
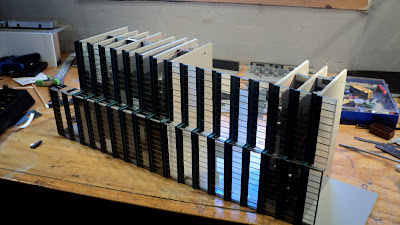
Since the last update I had the somewhat formidable task of creating, adding, and lighting the interior floors. This is obviously fairly time consuming, and in an effort to reduce costs, most of the details (office furniture for the most part) also are scratch built or just found parts that give enough of an impression to work! Below you can see my work to add in each floor.
While I am gluing in each floor (the material I am using is -again- a 'foam PVC' material called 'sintra' which I love for this purpose) I also am adding in my LED strips (again, using the fabulous LED strips which you find off of ebay!). I have a process where a 3-LED strip is used for a 'half lit' / half occupied floor, and a 6 LED strip is used for a fully light floor. Alternating and making the lights on/off helps to make the building lighting look more realistic.
Checking the progress.....
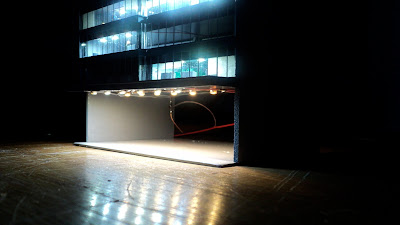
Once all of the building floors were done, I still had to work on the ground floor and the top floors (the roof will have a somewhat asymmetrical rooftop). I really don't have a plan for my scratch-build, but I try to plan ahead to have several options and then try different looks to see what might work best. For the ground floor on this building, I decided that an overhanging canopy (that also works as the 'floor' for the first office floor!) would work, and that this canopy would also have the 'blue' trim that the rest of the structure would have. This little detail actually took a whole weekend as the styrene and sintra had to be cut, glued, puttied, sanded, and painted before I could move on!
Now with a suitable roof for the main floor lobby, time to figure out what will go inside! I had already prepared some clearl acrylic plastic for the entry glass earlier, but the interiors needed some detail.
I marked out the main 'travel area' for people to go to the elavator bays (which will be printed onto paper and glued to the back wall) and those areas where a some coaches would be found as well as a waiting area for visitors, etc...
I needed some better lobby furnitre than anything I had on hand (or really, anything that is produced! Plenty of picnic benches in N scale, but very few couches or furniture items! A lament I have made many times on this blog!). What I did was used some corner styrene strips (the wide ones; nearly 1/4" I believe), trimmed down one side that would be the 'low back' of the coach, glued the 'long end' to small strip of styrene (to life the 'seat area' off the floor), added some colorful paint and...wallah! Your 1960's kodachrome futuristic furnishings are born!
With the various areas of the lobby marked off, I was then able to glue all the details (including a small 'coffee stand' in the back corner) to my lobby floor section.
Installed and tested! Looking good!
Rooftop!
The rooftop is the last major section to need completion, and is currently only about 90% complete. Most of my effort has been to try and figure out how the asymmetrical / two-story higher section will integrate with the rooftop patio on the other half of the building. Some more home made furniture, a small platform light, a picnic table (Finally! A real use for a picnic table!), some foliage in a planter and a tree round out the roof details.
Installing the wall on the roof section really helped the building look more finished, but blue trim still needs to be added, and the back wall section is still missing.
But...whew! Now I remember why I only do a few big kit-bashes...these buildings are a ton of work! I won't be able to put in much 'hobby time' in the next couple of weeks so finally completing it will still be a few weeks away, but I'm really pleased that the end is in sight!
Labels:
FALLER,
led's,
scratch-building,
skyscrapers,
structures,
tips+tricks,
urban
Subscribe to:
Post Comments (Atom)


Looking great! The work is definitely worth it for out these projects keep turning out.
ReplyDeleteThis is, as pretty much always with your structures, an awe-inspiring result. I really want to see photos of that in the layout.
ReplyDeleteNice, Jerry!
ReplyDeleteThanks Everyone! Whew! I'm excited to get back to work on this after a long week of work!
ReplyDelete