9.28.2012

La Taverna - A Background Building

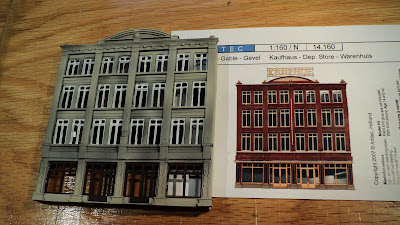
One of the buildings I've wanted to try and create for my city was one of those type of cafe's that extend out onto the sidewalk.  They are most often associated with cafe's in Paris, but you can find them in major cities. The photo below shows the victim on the right and the real cafe I followed for this idea:
My approach was as follows:
  • Kit-bash an old, unused, and unloved Model Power/Pola building facade
  • Scratch-build the sidewalk cafe section with clear acrylic
  • Create an awning from paper (printed on my printer)
  • Add lighting, etc....
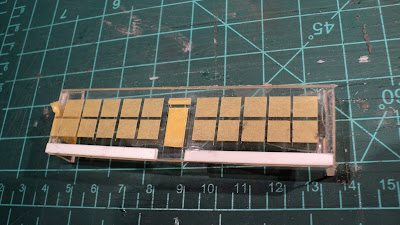
Below is the scratch-built sidewalk cafe section with strips of Tamiya masking tape applied and then cut at identical intervals to give the effect of square windows.
After coating with several VERY LIGHT coarts of paint, the masking tape is carefully removed (the coats of spray paint can peel off with the tape, so care is required when removing the tape)
There are then several efforts to fit the new 'cafe front', the signage above the awning, and the awning itself to the building.
Once assembled, I think I was getting pretty close to my goal:
Light, of course, makes everything better!  Next up....this building with some of my other 'background building' facades on the layout!

9.20.2012

Locomotive Roster: SNCF X73900; Arnold HN2101

One of my most recent acquisitions has been this Arnold model of the SNCF X73900 diesel railcar in the scheme of the regional rail authority of the Alsace Lorraine region.
My video review covers a lot of of my thoughts on this locomotive, so I'll try and briefly make a few observations if videos are not your thing.    First things first...this is what would be called a 'railcar' (I slip and accidentally call it a "DMU" (Diesel Multiple Unit") in the video, which is obviously incorrect as there is no 'multiple!') which is essentially a self-powered diesel powered locomotive for transporting passengers.  Not common in the USA these days, the best example in history would be something like the old RDC ('rail diesel cars').   For the SNCF, these classes are called 'autorails'.   According to Wikipedia, this class was developed jointly with the DB and have been in operation since 2000.   I was initially unclear on the distinction from the identical X73500 and X73900 versions, and discovered that the X73900 (the version I have) is designed for cross border transport.
First off, the cost is pretty high....this unit cost me $209 USD (well, it was a birthday gift), which in my view is too much for a locomotive or a 'railcar' (the exception being more complicated steam locomotives, or 'big' complicated units like the crocodile, etc..).   I won't go so far as to say I still think its a good value, but it certainly is well done.  It goes without saying that you should expect the interior lights, reversing LED's and easy decoder install via NEM 651, all of which this railcar has.  So far so good.
The design is definitely modern and has sleek looks.  It does fine on my sharpest radius curves (282mm Radius Katos) but it definitely does not look very good doing so!

Where Arnold did a very nice job was in the decoration.   Obviously, we've come to expect crisp and sharp printing, but I am still a little amazed each time I get up real close and see to what can be achieved these days.   Very nice!
There are multiple versions from Arnold available (as well as even more alternatives from a small French  manufacturer called Mikado train).  My version is the livery of the local rail authority for the Alsace -Lorraine region - which is not only strikingly colorful, but is also the home of some nice memories from my visit to Mulhouse and the Cite du Train museum last year!
My one concern or annoyance...it seems slow!  With this sleek design I would have expected a bit of a 'racer' (although, not TGV speeds of course!) rather than what appears to be some rather slow gearing.  Nice for slow station stops, but not going to set any records!

All in all, a nice model!

9.13.2012

4 Background Buildings

Behind the new passenger terminal, and across from the "Martel" warehouse, is a long, slim blank area.
Sparse in details, this area is now the focus of my attention.   This new project has me now working on 5 separate 'facade' buildings for this area.  Three of these are 'Artitec' kits.  More photos of these kits un-assembled over on "Scaper's" Flickr site.
The above building is a kit bash of two Artitec 'facade' structures to raise the height of the building from 3 floors to 5. The building still needs its details, lighting and other elements applied.  I may also add a bit more paint.  While I like the overall look (the detail came through nicely), it might need a bit more color.  To be determined.
The above is clearly a department store of some sort.  The package photo clearly shows what apears to be a red brick building, but I'm not so sure I wanted that look, so I tried to stick with a more 'concrete/stucco' style (or painted brick!).   I should mention that these Artitec kits need to have extensive cutting of flashing...so every single window needs to be cut, trimmed, etc...  They are a lot of work!
The building above is cheating.  Its actually an HO kit, but I found that by removing the HO-sized door and replacing it with an appropriate N Scale doorway (I used a leftover double door from the Walthers Hardwood Furniture kit that became the Martel warehouse) it turned into a fairly convincing N scale building.  I don't know what this building is, or what it could be.  Some sort of temple, church or something?  Whatever it is, its a good urban facade that is unusual and will look really nice I think.
Finally, the above is a structure that is probably pretty familiar to most folks.  I believe this is an old Pola mold that was re-marketed and sold by Model Power here in the states.  A long time ago, this was a Movie Theater.  I'm in the process of converting it to a building with a very Parisian style cafe on the ground floor.  The photo to the right of the building gives you an idea of what I am trying for.
When they are complete (lights, details, interiors, paint, etc....) they will look something like the above row of structures.  Compare this photo with the photo at the top of this post to kind of get an idea for where I am going.  You'll notice the structure to the right (which will be on the corner) is the kit-bashed/scratch-built Arnold structure.

I do have to say, facades are a lot of fun.  I think I enjoy focusing energy on just the 'faces' and not having to put a lot of thought or effort into the 'rest of the building'!

One other thing that I did that was different was my painting technique for the three Artitec buildings (most noticeable on the 'temple' building as well as the 5 story facade).  I tried I technique I read (or looked at) in the French model train magazine "Loco Review" (no, I can't read French, but the photos are pretty good - plus some of the words can be looked up or are easily translatable to English!).

Anyway, the technique is to paint the buildings in all black paint (spray can is fine - similar in a way to how Games Workshop / Warhammer painting is recommended), and then spray over the black with an air brush.  Because I'm lazy, I usually prefer spray cans to the air brush (cleaning and all that!) but I have to say the little bit of extra effort to use the air brush (and the nice pallette of paints available) really makes the details pop and the black under-coat really gives a natural texture to the surface that the rather crude coverage of a spray can can't match.

Hopefully in my next post I'll have things lit up and shining on the layout!

9.09.2012

Deconstructing and Kit-bashing an Arnold Universal Structure Kit

I've expressed my enthusiasm for the old Arnold Universal Structure kits - which are increasingly hard to find - in the past.  Last winter, a friend on one of the N Scale forums shared a tip about about a pretty rough-looking, completed version of one of these Arnold kits.  Well, it was definitely in rough shape, but I won it for a some pretty small change so it could turn out to be a fairly interesting deconstruction project.

On that note....How do you take these old kits apart?  Carefully, slowly, and with lots of luck!  Mostly your hoping that the original builder used poor glue for plastic and didn't do a solid job of applying it.  Even then, you still wind up with pieces that can't be saved and wind up in the trash. 
After all the pieces are pried, scraped, or cut apart, its then down to sanding and cleaning them up, and applying a new primer coat of paint.
Fortunately these leftover bits of the above structure are now finding a new life in a kit bash structure I've started work on.   The concept here is that I need a really shallow backdrop building, that can also be used on a corner.  The Arnold bits served as inspiration for a modern office building with some ground floor retail.
  
 The upper stories will actually extend over the sidewalk / ground floor a bit as the most narrow Arnold sections I used for the 'skinny' side are still a bit too long for the rest of the backdrop, but I think it will turn out okay.  If that last comment didn't make any sense, it should be clear on my next post on the rest of the backdrop buildings!

That's it for now...got quite a few layout things in the hopper (hey! Its Fall! That's modelling time again!) so I need to get back to work!

Thanks for reading!