5.31.2012

The N Scale Building Group

DSCF1600aDSCF1594aCosmic 22 story Condo/Apartment/HotelScratchbuildingFlatironAlong The Main Street
DSCF1556aDSCF1555aDSCF1549aDSCF1530aDSCF1451a
DSCF1557aIllinois Central N scale layoutDSCF1415aDSCF1420aDowntown QuinntopiaThe "Banal Apartments" and the "908" building.
Downtown QuinntopiaDowntown QuinntopiaBackground BuildingsBackground BuildingsHarley N ScaleDSC01873
The N Scale Building Group, a group on Flickr.
Share your 1:160 buildings at the N Scale Building Group!
I've developed some great friendships with fellow N gaugers (ranging from 1:148 to 1:160!) who are passionate about pushing the edges of N Scale buildings! Together we've created a place to post and share photos of our work so that it can be used for inspiration and encouragement for everyone!

So even if you just want to share photos of a kit you completed, a scratch-build you put together, or your entire virtual urban environment, please feel free to join and post your photos of your building creations at the N Scale Building Group on Flickr!

5.28.2012

The Terminal Station! Interior Details!

As I mentioned in my last post, in this post I'll dive into a little more of the details and show (obviously with the the above photo) what the ~80% complete model is starting to look like!  The first thing you may notice with the above photo is that the roof over the archway still needs to be completed.  Simularly, the lighting for the central entrance/arch section will also be added once the roof structure is complete (something I'm still working out in fact).
The above photo shows the entrance to the station, tracks can be seen in the distance.   The railings used for each level are from Casco.  These are clear sheets of plastic with the railings printed on them.  They have some limited uses for when a fence with some glass is appropriate, but are perfect for this sort of installation.
When you enter the station, there is an information booth on the right.  The customer service agent's uniform looks surprisingly like a Japanese school girls uniform!  Hmmm...(not that you can tell with the poor focus this shot!).  The booth was made with parts from Luetke Modellbahn, and an outdoor laundry-hanging assembly from some old Kibri or Faller kit.   I used hollow, rectangular styrene and an image of television monitors from Gare du Nord to create the monitor rack above the counter.  I sort of wish I had added lights to this to get more of that television monitor look but, oh well, can't do everything.  Here's the photo of the monitors from Gare du Nord used in the above booth:
Behind the information booth is the first of several 'guest services' on the main level: "Dat Backhus" - essentially a bakery/coffee shop - I don't think I've ever visited one myself, but I took a photo of one on a trip to Hamburg last year, and it served as inspiration for something different.  I really had fun putting this together.  Its all scratch-built using styrene and images of breads, etc... that I was able to pull off the internet.
Another shot of the counters at "Dat Backhus":
Behind "Dat Backhus" is "iKiosk" - a newsstand.  The shelves are (again) from Luetke Modellbahn, but as they are just shelves with no detail, I felt like they needed more detail in this prominent location.  So I found some images of magazine racks, reduce it down to approximate N Scale size on the computer, then printed them out and glued the printed image to small strips of styrene.  Once the glue dried, I had nice little 'shelves' full of magazines!  I am quite proud of this detail and looks really great in person.
On the left side of the terminal is "Flunch"....I don't know what you think of when you think of French food, but a family favorite of ours is 'Flunch'! Essentially a cafeteria style eatery that my family found on a trip to Paris a couple of years ago.  I recreated the signs on the computer, created generic looking images for the back walls, but used dining tables from Luetke Modellbahn for the seating.
Behind Flunch, on the way to the elevators (or 'lifts') is Karstadt Sports (yet another real place that I visited on my Hamburg trip).   Not a ton of detail in this shop - but I didn't think it was necessary.  The shelves are computer procured images of store shelves, shrunk to 1:160 (or thereabouts) and then glued to strips of foamcore.  Simple, easy, and cheap.  The thing I really like about Karstadt Sports? They have a model trains section in their store! Can you believe it!!! Ah well.....
The below photo is basically what you will see if you were to arrive by train.  Here's where a bit more work is still ongoing.  The structure on the left side extends out and needs detail and structure to complete it.  The roof canopy and - critically - lighting still needs to be installed, but the general 'glow' and 'ambiance' of arriving at a busy, modern station has, I think been achieved. 
 A closer view of the shops and the three levels that make up this station:
And that, pretty much, is an up to date view of the station!

5.27.2012

The Terminal Station! Construction Update!

I would like to say "Done!" but its really only...almost done! You may have noticed I quit talking about the new passenger terminal for the past six or seven weeks.  I took a break to basically get some inspiration and start working on it trying to figure out the passenger terminal building for this area of the layout.

My original idea was this modern, curving and somewhat simple and elegant one or two story structure:
But I sort of lost inspiration for it.  So I started looking online for other ideas of what a modern, busy, urban train station would look like.  And - wallah! - I found my inspiration!  Yes, the new Berlin Hauptbahnhof (photo courtesy of Jorge Láscar and Wikipedia)!
Again...I used the Berlin station as inspiration (neither my skills or interests were in an exact reproduction) and took some creative license to make this concept work for my station.  In my next post I'll share more details and more progress, but in this post I'll cover the basic construction.

The main materials are clear acrylic sheets, with laser-printer windows and structure on transparency sheet.  The transparency sheets are glued to the inside walls of the buildings.
This is actually three buildings, not just one, as there are the two side towers and the center arching area that connects the two tower buildings.  The arch sections were constructed using the same technique as the office buildings.
The interior floors of the building are either 
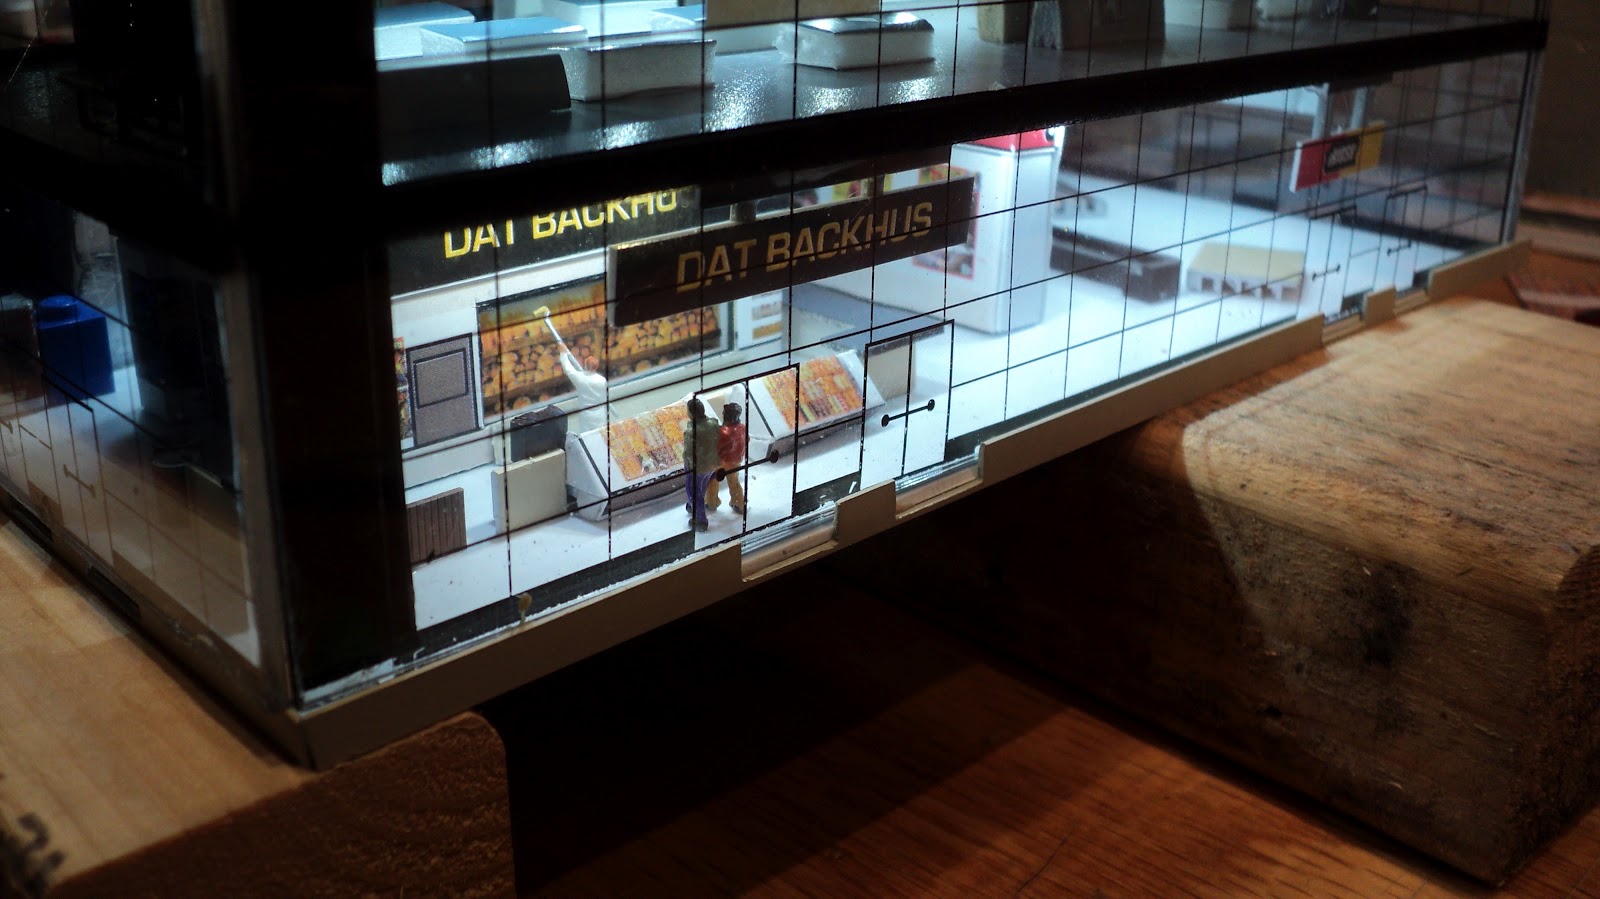
sintra sheets or foam core.  On each floor, I glued a lot of angular sections of (usually) pieces of foam core.  Although most floors won't be lit, it wouldn't look right if the floors looked empty...even fairly abstract shapes cut from generally unsuitable foam core material is a quick and easy 'interior detail' effect.  The floors that will be lit will get furnishings that are slightly more suitable and detailed!  You can see in the below photo (mid-way through floor installation) the wiring for the LED strips used to light the interior:
Once the floors and lighting were installed, it was time to 'commit' and glue in the remaining walls!  The below photo is a mock up prior to this step to ensure everything would fit.
While my laser-printed transparency sheets had a 'black' strip to act as sort of a floor divider, the toner is not dark enough and the effect is just not convincing enough for this to act on its own as an archetectural feature.  So once all the walls were securely glued, I masked out the windows and gave the exterior of the building a shot of semi-gloss spray paint to create a more realistic looking interior.
The 'floors' of this structure took a lot more work than the below photo would indicate.  For one, recall that this floor sits atop two other floors; so elevator shafts, stairways, etc... all need to align with this floor. Additionally, I had to think about where the wiring would enter, how to set it up so that the center arch section would fit snugly between the two towers, where and what kind of shops would be available to passengers as they enter (or exit) the terminal, etc...  The below photo shows the floor section without any of the structures added.
Flipped upside down you can see my wiring.  As you can tell, I like using LED strips a lot.  They give you really nice coverage with less time soldering, plus you are using SMD LED's which really conserve on space.  No, its not pretty.
 And finally, setting the 'towers' onto the floor, running the wiring and checking the fit!
On my next post I'll have some shots of the station as it appears on the layout.  Everything seems to be working okay so far, although the center arch section is still not complete, it is now finally starting to look like the modern station I was looking for!

As always, thanks for reading! Please feel free to leave a comment if you have any questions or comments!

5.11.2012

New Toy! An X73900 from Arnold!

A full review later, but one of my birthday gifts this year was my long awaited X73500 diesel railcar from Arnold!
Quickly converted to DCC, I've been enjoying a few laps around the layout.


As you may see in the photos, its a great looking model!  Some really impressive, very fine printing (particularly in the Alsace livery, which actually features a map as part of the design!).

The one thing that has me scratching my head a bit is the models very low speed. For a sleek looking diesel railcar like this, I expected a little 'pep', but my model crawls like a freight locomotive! To be honest, I've been experiencing some anomalies with my Roco Multimaus Pro/Multizentrale set up and I just changed by track voltage from 19v to 13volts (discussed here) so I'm investigating if either of those are in some way responsible for this. 

Anyway, at some point when I can find time, I'll do a full video review (and will hopefully have this mysterious slow speed issue either fixed or an answer!).