12.29.2008

Wiring and touch ups


It's been over a week since my last post, but I've been busy.... not only with our family celebration of Christmas, but the eventual 'wiring' work that must be done. Unfortunately, there is not a lot to show in terms of progress, but I must say that I am glad that this part is almost done!

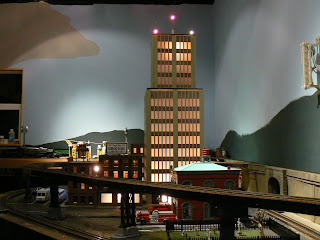
Below are four photos of the same location on the new layout. I suppose the time frame from the first photo to the last is about 2 1/2 months.

12.20.2008

Track down!

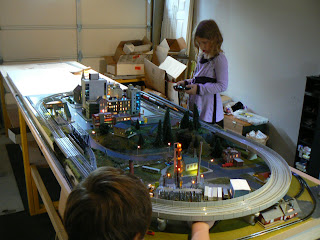
With most of the major 'messy' scenery work done, I was able to lay the track and run some trains! I'll go into more detail and post photos as I get some of the remaining lose ends of scenery and track mounting completed, but for now here are a couple of shots of the layout as it stands a few days before Christmas:


12.18.2008

Final Stages of Major Scenery Work almost complete!

Well, time to celebrate! Most of the major scenery work is now almost complete...a few more minor things and I am ready to start laying the track and work out the little details (where the track won't be compromised by messy major scenery work!). A few photos to show the progress:


Adding Foliage

In my previous post, I explained how I really enjoyed adding scenery by using a mixture of acrylic paints and ordinary white glue to provide a good base for the ground color (in my case, a grey-ish color) to top off with all the flocking and other sprinkling. In this post, I want to add to that technique with a very cool and very good looking product that I've discovered from our German hobby manufacturing friends at Heki and Noch.

In the below photo, there is some bare scenery to which was applied the 'grey' paint + glue mixture:


Next, I tear a piece of Noch Foliage. This material is similar to the standard flocking material that we have available in the states, except that it comes in a sheet form (without any visible backing) and little pieces can be torn (or whatever size you want) and then placed on the layout:


The foliage material is then simply placed on the wet glue/paint:


And when finished, this very easy, and comparatively 'clean', process yields some very realistic results:


A view of the same 'wall area' with a little more scenery added using the same basic technique:


And an almost final view of the entire area, still, not quite finished, but I think the results are looking good.


What I like most about this process is that it was relatively fast, a lot 'cleaner' than sprinkling powdered flock all over the place (and NO spraying of glue to hold it in place!) and the results turned out quite nice. Below are the main two products I used for the area shown in the photos:


The Heki product, a longer 'wild grass' is similar material on a sheet, but is long grass....a lot easier than some of the electrostatic methods that look way too complicated. The only down side with these products is that they are not the cheapest available, and you'll have to order them as most hobby shops don't stock these items from these companies.

12.15.2008

A better way to add scenery

I read about this technique in the Minitrix Guide. Yes, there are dozens, maybe hundreds, of different books and articles on how to add scenery to your layout, but this method I read about in the Minitrix book was new to me, and I decided to try it.

In the past, I have used the traditional ("Woodland Scenics"?) method of applying glue, sprinkling powdered flocking and material, and then spray it with a covering of diluted glue, water, and dish soap.

In this example, what I did is not so different. The big difference, and what I like about this approach, is mixing your white glue (good old every day Elmer's works just fine) with some acrylic paints (get the cheap ones!) to create a sort of greyish ground color.


Why grey? I don't know what it is about grey but for me, and the type of landscaping I like to model (forests, grassland, and mountainous areas), a greyish/brown sort of color is a very good looking representation of soil / ground. Of course, that wouldn't work if I was doing a desert or arid landscaping...

After mixing your glue/pain mixture, apply liberally to the area to be covered. In this photo, I am actually retouching an area on my original layout that needed to be fixed up.


After applying the goop, I went with the standard canisters of Woodland Scenics materials. Wa-lah! The grass is greener! And the great thing is that you don't need 100% solid coverage with the scenery material to make it look good, as those areas where it is more thin, the grey paint shows through for a very realistic ground appearance.


There's another approach using some European made scenery products that unfortunately aren't readily available at your local hobby shop that I think are even better than this (or a nice complement to it), that I will show in a later post.

A rigid sub-base

A material that I became acquainted with through my Dad's use of it for creating indoor signage, is "Sintra", which is 1/8" thick, black plastic sheet material. I get it in large sheets from Tap Plastics, and then cut out the area to be used to fit on top of my styrofoam structures.

You can see the black plastic glued to the top of my styrofoam areas:


Obviously, having a rigid foundation is nice to ensure a nice, level and firm sub-roadbed. The disadvantage of this material is that it does seem to conduct track noise a bit more than other materials, but its something I can live with.

I also use this material to construct some of the custom bridges/overpasses shown below.

Other landscaping: Custom bridges and walls

One of the challenges when designing a layout is that inevitably you will create a problem where there is no adequate commercial source to solve your landscaping problem. For me, there were two 'design challenges' that did not have either an economical or suitability for my design, and these were two longer than average 'bridges' and multiple retaining walls.

Overpass / Bridge:


The above photo shows my 26 inch, two line, railroad 'overpass'. This was constructed using 1/8 inch 'Sintra'. which is a material I use liberally all over my layout as sort of a 'sub-roadbed' to sit on top of the styrofoam. It give a nice, rigid base for layout track and scenery, and is also ideal for adding in more rigid structural elements (like this bridge).

The sides of the bridge are made of styrene, while the supports are actually repurposed and cut MTH Steel Elevated Supports that I had leftover from my O Gauge layout, cut in half (they are about 6" for O Scale, and I cut and sanded them down to the 2" I needed). Will complete all the details and painting once the track is in place.


Retaining Walls:

The retaining walls are pretty straight foward. These are just sheets of Evergreen Scale Modules O Scale brick walls, that look like decent retaining walls in N Scale. I then add strips of styrene every two inches or so, carefully placed to cover the seams, to give the effect of the vertical supports and all to the overall effect of a 'real wall'.

Adding Rocks

Having removed the Unitrack from the layout (see previous post), I am now at liberty to make a complete mess of the layout wihtout fear of harming my track!

First up, are some stone molds from Woodland Scenics.


I added some acrylic mars black paint to the Hydrocal batter to give the rocks a pre-formed, dark grey look. Inevitably, these will chip I expect, and rather than a 'bright white' chip, the extra 'insurance' a dark grey plaster will provide is a very easy and worthwhile step!


This was my first attempt at casting and using these rock molds. My dad showed me a thing or two about these a couple of years ago with my O gauge layout, and it looked a lot easier than I thought it was going to be. And I was right! Two important tips: One, get the mix of water to plaster right! My first mold was bit too 'wet' and the casting did not turn out all that well. I learned my mistake, and the mold is still salavabeable, but lesson learned! It is worth it to measure the water and powder! Lesson 2, is that ordinary household 'Pam' (a cooking oil spray usually used for muffins and other househild baking!) is great for spraying into the mold before pouring in the wet plaster. I had no problem removing the hardened molds.


Of course, now that I've completed my rock molds, time to clean up the rubber molds and prepare to sell them on eBay!

A layout process with Unitrack

My planning process for the layout is based one over-riding principle: In order to preserve and create a running environment that is as flaw-free as possible, all scenery and landscaping will be done without the track on the table!

This, to me, is the greatest benefit of Kato's Unitrack. Since it is already ballasted, a lot of the traditional books and processes for landscaping (apply roadbed, apply track, scenery, ballast, clean up) are just not as relevant wiht Unitrack, so is there a better way? I think so.

However, this will mean some loss of detail. As good as the Unitrack is, its not perfectly realistic. I am willing to make that trade off, and I hope that the overall performance of the layout and cleanliness of the track outweigh any tradeoffs in the appearance.


So, after having decided on a final track plan (see below), and then adding in all the 'structural' elements (styrofoam, risers for grades) and the 'terrain smoothing' application with Sculpt-a-mold, I have a very ugly, but very useful layout wherein I layout all my Unitrack and do final checks for clearances and track placement.

I carefully mark the 'clearance' and footprint areas for the track, and then remove it all. Now on to the mess that is known as applying scenery (without the expensive, sensitive, and critical pieces of the track sitting in the line of fire to get ruined or compromised!).

The one thing that my process may not address (and I am admittedly a bit lazy to figure out how to solve for this) is that I don't disconnect all of the track, but keep it in 4 to 5 foot sections for easy replacement once the scenery is in place. This leads to the inevitable 'bowing' of the track as you attempt to manipulate 7 or sections in between the layout and a holding area while doing the scenery. I am concerned that this will loosen the uni-joiners leading to poor contact later. I may have to replace some of the uni-joiners as a result. We shall see.

12.06.2008

Making progress on the new layout!

I have set an 'unofficial' deadline to have most landscaping and most track all laid and wired by Christmas. As of today, that's only 18 days away...and there is still a lot to do!

Here's the progress so far. Below you can see the original 'single door' layout (with my kids) and then beyond it, the 'expanded' (and bare) extension:


Here's a shot from the opposite side of the layout (this is late in August):


From the same angle as the above photo, below we jump ahead to the end of November...styrofoam is being laid out and actual track planning is being performed to ensure that the 'computer model' of the layout will work in reality!


12.05.2008

The good and bad of my first N Scale layout

The City


As opposed to my O Gauge layout, which took 3 years to get to a state of completion, my N Scale 'layout on a door' took less than 3 months! However, as I mentioned in an earlier post, I think I like the process of 'building the layout' almost as much as running the trains (at least some parts of it) and the rather limited operations of this first N Scale layout needed to be addressed. Some parts of 'version 1' will be carried through to my expanded 'version 2', such as the 'downtown' or city area.

The above photo shows a 'birds eye view' of the 'downtown' / city end of the layout. As you can see, operations were basically two very simple loops with the city on one end, and elevated tracks going over an industrial area on the other end. The city has several buildings from Kato and Tomix, which are obviously based on Japanese prototypes, such as the blue and green buildings in the below photo. I like the modern look of these buildings on the layout and I must say, the packaging and construction of these buildings is really great.


Sitting next to each other on the end of the city area are two buildings that I really enjoyed for different reasons. The large church is the Vollmer 7760 Cathedral, which I think turned out really nice. I wanted a building with a very 'gothic' look to it and the Vollmer cathedral works nicely. I also placed a small white LED in the steps in the front of the cathedral to give the tall spire some 'up lighting' and to further highlight the models shape and detail.

The building next to it may be recognizable to most people, its pretty much a standard Model Power 'ready-built' movie theater with a bit of customization. Rather than using the basic plastic signage that came with the Model Power movie theater, I thought I would add some light and animation with one of Miller Engineering's theater marquee lights.


In addition to the animated sign, the building was repainted (as a lot of the structures on my layout are prone to!) and multiple LED lights were added. I still have some touch up and detail to do to the theater, but overall I am quite pleased. The hardest part was bending the plastic 'marquee' so that it would match up with both ends of the building. The instructions for these things say specifically NOT to do that, so maybe I got lucky! It does work, so I'm not complaining!

12.04.2008

Revisiting my O Gauge past


Just for fun, here are some shots of the old O Gauge layout that was demolished last year (and whose parts where then sold on Ebay to fund my new N scale layout!). Note that all of this is set up in the 3rd stall of my 3 car garage (and to prove it really is O Gauge, that is a real boy [my son] peeping through what will become the 'city' area of the layout).


Shot of the second level 'trestle' as a mallet circles the city.

The same locomotive on an MTH bridge at the far end of the layout (the door could be opened to let in natural light...and bugs. But mostly just bugs).


This shot shows the 'main line' with a Lionel U33 on the upper level and the Lionel Army train on the lower level, both are round the 'large' mountain on one side of the U of the layout.

This shot is from the door coming from the garage into the 'train room'. Does it look a little cramped? It sure felt like it. One of the reasons to go to a smaller scale!


Another shot of my favorite part of the layout, the city. Unfortunately, the control panel for my home's electricity is about 6 inches to the right of where I am standing, which is not great for radio signals (e.g. MTH's DCS system had difficulty).

And of course, the 'track plan' showing the location of the door, main lines, etc... It was pretty much 80% complete and took about 3 years to complete.

12.03.2008

My first Minitrix set!

Trix has done a fine job with the "Super Starter Set". A digital system, nice cars, and some nice locomotives. It helps that I have no particular "Era" in mind to model. In fact, one of the things I like about modeling primarily non-US worlds is the fact that I won't get to compelled to be obsessive about the prototypes...my main rule now is FUN and get what I like! Regardless of country, era, etc... (But it must be digital!)

The Class 003 in the set has been a really fine runner, as has the V 200 (I believe that is its designation, but I am still having trouble understanding all the taxonomies of German and other European locomotives). Of course, as most people know, it pays to shop around for these things! I paid around US $739 for the set, where I saw other dealers (online) with same set in the $900 range!

Something else that I was pleasantly surprised by was the detailing and pure beauty of the passenger cars. This was very impressive and further confirmed the new direction of my hobby!
And finally, the below photo shows the V 200 at my station (which is a KATO Overhead Station), alongside my second purchase: the Dutch version of Trans Europe Express from Minitrix...this one with sound, and the KATO Thalys (see what I mean about disregarding eras and having fun)!

My first insipration and first purchase


What inspired me to make the switch from O Gauge was the Trix 2003 catalog. Somehow, a copy was given to me at the Toy Train Shop in Oakland California back in the Summer of 2003. This was still while is the middle of my "O Gauge' days, but I was also somewhat disillusioned with the hobby at that gauge for a couple of reasons. The scale is just too large, while its fun to hold and run these large locomotives and cars, building a layout and acquiring new equipment were very expensive. I also was not sure what railroad' line to model, and I did know that the space requirements for O Gauge were always going to be something of a challenge.

So seeing the Minitrix 2003 catalog triggered something in me. For one, my dad had built for me a small N Scale layout back in the mid-70's that counts as my first 'read' model train experience. So there was quite a bit of nostalgia in this scale for me. I also recall the Minitrix brand from those days. Needless to say, being exposed to the brand again after nearly 30 years brought a lot of excitement and joy to a hobby that, for me, was starting to become a burden. N Scale, and Minitrix, I thought, would one day be in my future.

We moved from the Bay Area (San Francisco, Oakland, etc...) to the Seattle area, where I build one more O Gauge layout in the 3rd stall of our three car garage (sealing it off with its own wall from the rest of the garage to make it a true 'room' rather than a garage space. This layout was a project and nearly complete, when in the Spring of 2007 it had to come pending a move (that never actually happened). Tearing down the O Scale layout was a mixed blessing, its sad to see something that you put so much work into get torn down, but I know that I could now 'start over' in model railroading with N Scale.

I put nearly all of my O Scale collection on eBay, and was able to use the money I made from these sales to start my N Scale / Minitrix era!!!

What was my first purchase? This nicely packaged set: The Minitrix Trix Systems Era IV Super Starter Set with 2 Trains and a Large Oval of Track (11120).

Why this one? For one, it came with a DCC system (the trix Mobile Station) which would help me make the direct leap into DCC without too much trouble, and I knew that I wanted digital control after having great success with in the O Gauge scales. A set is always a great way to get the ball rolling, and I like the combination of the diesel and the steam engine.