12.29.2013

Bookcase Diorama Project #4


Since my last update I've been able to lay roadbed and track for the bottom and second level, and have started to work on the structure for the 'third level' of track and the street (or top) level.

In the below photo you can see me using the tried and true method of using white glue (actually, I used carpenter's / wood glue version of white glue just because it was handy) and pins to hold the track in place.  I wasn't sure how the ends of the track were going to work, but with the help of my Dremel was able to get a nice even cut of the track to match the front of the diorama:
You might also notice some 'pipework' that I added to the top of the retaining wall.  It seems like major retaining walls you see in urban areas always have some sort of stuff attached to them, so I figured some piping (created with styrene rods) would add another level of authenticity!

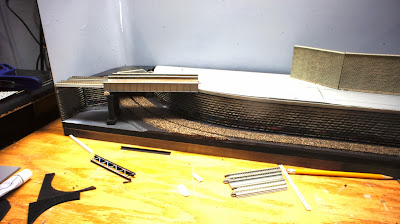
Below is the cork roadbed applied for the second level, a Kato two-track girder bridge, and another section of unused Kato double-track that I will convert to another bridge:
 And below is the track laid down on the second level:
 Finally, a shot of the last level of track (this time a single track line) which abuts another retaining wall which will be where the city level / street level facades will go:
From the other side, I am thinking of adding a road bridge over the tracks on the other end of the diorama to add more depth and dimension to the diorama.  I'm intentionally trying to make this diorama as 'busy' as I can make it!

12.28.2013

Quinntopia Featured in Trackside Model Railroading Magazine!

http://www.tracksidemodelrailroading.com
I've been asked a couple of times in the comments on this blog if my layout has ever - or will ever - be included in any of the model rail magazines.  Well, today I am here to tell you that it has!  The good folks at Trackside Model Railroading visited me in October after hearing about my layout from my Dad after doing a feature on his HO model club for their magazine last Summer.

Not only did they shoot some awesome photos (that put to shame my attempts!) and put together a nice overview of the layout, they also shot some gorgeous video and created a 10 minute long overview of the layout complete with 'real' train sound effects (so if you get a bit worn out by the over-the-top dramatic music of my own videos, you may like this approach! I do!  They did a fantastic job and has a completely different feel from my own videos).  Below is a two minute sample - see below for how to access the longer video and the entire December article:


Trackside Model Railroading is a digital-only magazine and is subscription based, but the publishers have allowed me to share a free copy of the December issue with readers of this blog simply by sending an email to the below email address (copy and paste the below into your email):

quinntopia@tracksidemodelrailroading.com 

After emailing Trackside Model RR at the above email address (which do NOT go to me!), you will shortly get an email response from Trackside Model Railroading with links for getting a free copy of their December issue as well as the links to the longer 10 minute video.  Please note that I am not associated in any way with Trackside Model Railroading.

I tested this out and it seems to work fine!

12.26.2013

New Montage Video for 2013

It has been a long time since I've created any layout videos (over a year), mostly because there have not been a lot of major developments on the layout for quite a while (a few buildings and structures notwithstanding, they are not really the most dynamic content for videos!).

So I put together this video which captures some of the layout running in the past year or so.

Hope you enjoy it!

12.18.2013

Bookcase Diorama Project #3


While it seems like I have been spending a lot of time on this diorama in the past week, the actual results seem somewhat sparse!  Isn't that the way with this hobby!

Well, I got the airbrush out to give some color to stone walls for the bottom level of the diorama.  I have a base layer of flat black paint (above), and painted on some Tamiya Medium Grey (below) at a sharp angle to preserve as much 'black' in the shadow areas as possible.
While the airbrush was out, I also gave the track a shot of Tamiya Red-Brown for rusty rail look. This is the same color I used on my layout and I think it looks really good.  Side note that after just using the grey, and then switching to the red brown, the air brush then started to get all problematic on me.  It seems with Air Brushes that you spend as much - or even more? - time cleaning them than you actually use them for painting!
Wallah!  Now with a bit more concrete color, the bottom level starts to take on a bit more shape...but I'm not done yet!
 Using my homemade decal sheets, I applied some graffiti to the stone work, tunnel portal, etc...
 That graffiti should give me just enough of a gritty, urban environment that I want with this diorama!
I'm not sure when to do the track work or ballast...I still have to work out the middle and top layers, so I am thinking of getting all of the mechanical aspects out of the way before I go too crazy with track and ballast and that sort of thing.  Hopefully I will have more progress to share shortly! 

As always...thanks for reading!

12.10.2013

Bookcase Diorama Project #2


Progress is under-way on the new "billy" bookcase shelf diorama!  The top photo shows the (now primed/painted) shelf diorama unit with some glue to apply an additional layer of foam core....

...and below is the extra foam-core layer applied with a 'cut out' section in the left corner to provide more elevation for the tracks on the diorama (this makes more sense if you look at the bottom photo):
Once the foam-core bottom layer adhered, I then worked out where my flex track would go, applied some cork roadbed, glued it down, and then cut out more foam core for the retaining wall (the blue clamps are holding some plastic stoneware sheets to the foam core in the below photo).
I've finally got the cork roadbed and enough of the bottom level retaining walls to start to get an idea of what the second level will look like.  You can see in the below photo where the second level tracks will cross over the bottom level.    You may also see why I added in the additional layer of foam core....this diorama will sit at eye level, and as there will be some sort of fascia along the front, I didn't want the tracks to sit right at the same level as the top of the fascia.
The retaining wall is the black area just behind the cork roadbed.  They are black as they just have a base coat of black primer on them right now.  I'm going to paint them a stone/concrete color and add some homemade graffiti decals as part of my next steps!