Here is the third and final part of Terry's journey to rebuild a Rivarossi Chapelon that he bought on eBay from...me!
For Part 1 click here, for Part 2, click here, and for my original blog post when I first added this same loco to my collection years ago. Jerry/Quinntopia
As told in Part 2, the arduous task of solving the Smokebox/light removal and repair issue was being solved by Terry:
Final apologies to The Italian Job and The French Connection.
Subtitle: Locomotive Repair for an N Scale circa mid-1980s Rivarossi French SNCF 231E 22 Class Chapelon 4-6-2 Nord Steam Engine and Tender
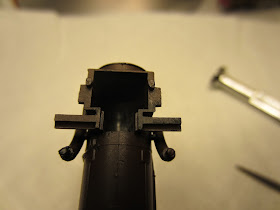
There are two missing ears on the threaded shaft insert that secures the post in the above photo; that is another reason I did not go to a full disassembly of the chassis and apron. That defect was not my doing. But it was evident I would need to be cautious in that area.
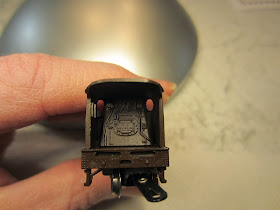
With a few refinements and adjustments I then dry fit assembled the locomotive to test the lights. I had already done several prior fits to ensure it was progressing well. And with a little 12 V juice they lit. It was a marvel. The lights were operating and back to their original configuration. This view shows the apron lights illuminated.
Now this gets me to wondering just what the French engineer and fireman were looking at in those days or nights. My cynical conclusion was probably not too much. Maybe this engine was intended to run clandestine excursions in cover of the night or darkness. But I suspect that field of forward vision in one of the smoking beasts at full steam was not very good. At this point of the rebuild I still needed to add more black paint to the rear interior of the smokebox to hide the light channeling through the CA glue and brass tube recesses. That since has been completed.
Once I was assured through fitting that the smokebox cover would not hit the lightbulb and bracket, I then used two tiny drops of CA glue to secure the cover to the boiler front. Some might advise against this, but it was not fitting secure enough to be held in place on its own.
And I did not want to lose that item. It needed to be secured. Besides, the light bulb was not made to be accessed from the front. One needs to remove the boiler from the chassis apron to get to its mechanics.
By this point I had also attached the cleaned air tanks to the upper boiler shell.
I used CA glue very cautiously. And once secure I placed small dabs inside the shell where the pins sit within the shell. By comparison to other similar vintage locomotives, I realize I may have inverted them. But it seemed that was the only way the tabs protruding from the tank bottoms fit within the holes on top of the boiler. Now that is a testament to futility. But ‘she is as she is’. I thought I had researched that well enough, but surely not. And I can only guess what picture I used for that final check to secure them. At least they are straight. And it is too late now; I will not attempt to reverse that move.
Next it was time to get the weight rod assembly installed.
Recall that the locomotive shell itself does not house the motor (or the ‘zamac’ thankfully). However, that renders it quite light in weight. And if things are out of alignment, I envision, and there are some reports, that the finely working tender driven motor at full steam will push that light engine shell right up and off the narrow track around a bend. Like a crab, moving crab-legged with legs scurrying sideways beneath the water. After all that careful work, if it hits the concrete floor you now have a true static display with plenty of spare parts for another. Fortunately it seems a rare occasion to have a good tender and locomotive combination. So if you are lucky it will either work correctly or not at all. All or none.
From all the prior work it was apparent the steel rod fit too snuggly within the boiler shell. It needed clearance. I filed the edges and top corners of the rod and screw that holds the headlight bulb contact blade.
The small clip at the lower right of the picture is screwed to the bottom of the weight rod once it is positioned inside the boiler. That spring clip carries power from the rear of the chassis and drive wheels up through the weight rod forward to the bulb base through the fine metal spring blade that contacts the bulb base center post. Here is a picture from earlier in the build that shows the narrow confines within which this all operates.
I also filed the inside of the boiler shell with a fine rat tail file. With time the rod was free to move inside.
As I noted earlier, after careful fitting, I had secured the front smokebox cover to the boiler shell. So the weight rod could no longer enter from the front of the boiler. But the rear of the shell in the cab has another opening that is covered by the coal bin doors. I will touch on that part of the rebuild a little later. That opening allows access of the weight rod and its workings from the back end of the locomotive boiler shell.
It was also necessary to make some allowance on the interior recess of the bottom boiler to accept the slightly larger lightbulb post base solder points.
I used a small file for that work...
These pictures show the nearly completed locomotive:
The front left baffle or side smoke shield has not yet been attached. The latter picture shows the small size of this locomotive. With very careful application (via a toothpick tip) I used CA glue to attach the left front baffle or side shield.
Note that the rear protrusions from the baffle side shields clip over two pins on the boiler sides. This raised recess on the right front baffle is evident in the left center of this picture.
These are not glued. But rather press fit and ‘hold’ the boiler front within the shields.

The picture above also shows the freshly painted front boiler cover. I realize it is still a little rough. But I have not yet decided how much to refine that. And there is still the question of whether or how I might add the Chapelon Herald that sat front and center on that cover. Sadly, that was turned to drilled plastic dust many years ago. The right front buffer (or bumper) still needs to be attached. It has survived and at this stage of the rebuild currently lives inside a plastic medicine bottle inside a candy box lid, inside a cigar box. (Ok, ok I confess. At this point I am reminded of Phil Hartmann, as the Anal Retentive Carpenter or preparing a Thanksgiving dinner as the Anal Retentive Chef on early Saturday Night Live (SNL) skits. If you have not seen those, give it a shot. I still recall them as some of the funniest of those days. But I have learned it is best not to lose some of these small detail pieces. They are quite difficult to find or reproduce.)
With some careful use of CA glue, I reattached the front buffer or bumper.
If you look closely at the bottom of the re-installed front right buffer, it is apparent that the gloss white paint was missed on the lower edge from the factory. Careful application of gloss white Testers enamel with a 3O brush corrected the problem.
Next I set about to ensure the boiler coal cover doors fit a little bit tighter. I mentioned earlier in the story that the boiler weight rod slides inside the boiler shell. When assembled from the factory I suspect it had the option of either end. But the front smokebox cover was quite loose in fitting. So I lightly glue it. This left the reverse end of the boiler shell to allow removal if need be of the weight rod.
I carefully placed some cyanoacrylate glue on the left edge of the boiler door recess inside the cab. I did not set the doors in when wet. Instead, I allowed the glue to dry fully. I wanted to create a slightly narrower channel to receive the rear cab inside boiler cover doors. I then fit the doors and carefully scraped any dried excess glue to allow the doors to sit tight.
Here are a few pictures showing the completed locomotive rebuild....
Here is a shot of the final locomotive with lights ablaze.
These photos show the completed locomotive and tender.
That concludes the journey of rebuilding one (of I anticipate thousands) of these vintage Italian Rivarossi N scale locomotives. It has been a challenging and a rewarding adventure. I have met several new friends, gained new knowledge and a new skill (although my wife might not necessarily agree). It also reminds me of days of my childhood, watching my father toil away at some of these fine little machines. Adjusting, lubricating and getting them to a better place. And that is a heart warming memory. Sometimes with dry eyes, sometimes not. I now realize that many times he was working on these late into the evening while my brother and I were likely sleeping.
For reference here is a shot of this particular locomotive as she was found.
Perhaps this particular French SNCF 231 Chapelon (4-6-2) might get to go to the prom after all.
Until we might meet again I wish you all well.
TJZ
Completed 4/26/2015
-----------------------
Terry - thank you so much for sharing this terrific story and impressive restoration effort on a beautiful locomotive! Well done and 'le felicitazioni'! - Jerry/Quinntopia


