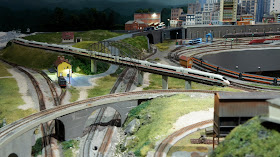
As a follow on to my 'Landscape Repair' post earlier this month, scenery work on this area continues to a point where I'm starting to feel good about this end of the layout!
I used my home 'built' static grass applicator (you know, the conversion
of those electric bug zapper things) with traditional flock powder on
most of this area of the layout. Its not a perfect applicator (in fact,
it stopped working about halfway through, which means I need to get
another bug zapper!), but I have found that after applying the long
strands of flock, a dusting of flock powder over the top fills things in
nicely.
Although I did use a combination of some of the 'sheets' of foliage materials available as well. The hillside on the left of the below photo uses some long-grass material that comes in sheets, and on the right is some of the foliage sheets I've used in the past (sort of giving an 'ivy-covered' hillside look.
The below photo shows the results of the fake 'electro-static' grass applicator combined with traditional flock powder and some very fine grey ballast material for the gravel road (I forget the brand, but the standard Woodland Scenics ballast is way too course for gravel roads, but this material is almost a rock 'powder' and works well for dirt roads, etc...). The photo may be too small to tell, but if you click on it, you get a larger version.
▼
9.29.2011
9.24.2011
N Scale Nostalgia: Busch Stadtbau System
Back in April I did a post on the old Arnold Universal Structure kit. Similar in concept - although radically different in execution - is the Busch Stadtbau System from Busch.
There is a whole series of different kits in the Busch Stadtbau system. The above photo shows the 0937 high rise of office building (and one of my favorites from the series). Bob/Scaper has graciously posted images of the old catalog photos showing the many kits and options available. There is also a site that has some limited archives of old catalogs (interesting in and of itself- although it appears to get good size images you need to order a CD) where, as near as I can tell, the last year that this system was offered seems to be around 1975. If this is true, that means that this system has been out of production for over 35 years! Which isn't really too surprising given how hard it is to find even previously built pieces from this series!
I've been fortunate to pick up a couple of unbuilt kits from this series, but I've not yet decided if I want to build them. For one, they're overall rarity brings out the collector in me (or at least, the 'preserver'!) which compells me to leave everything it the box! Additionally, I don't really have room on the layout anyway!On the other hand....these buildings could be the basis of a really cool 'utopian' city....I imagine an entire city modeled in this modernistic style would be really cool!
Well, I'm undecided....but at least for now, I'll hang to the too few examples of this fascinating system I do have and keep them for posterity! :-)
Just for fun, below are some scans of the instructions for the 0937 building.
I hope you enjoyed this final 'nostalgia' post for a while. Its hard to believe that N gauge is over 50 years old...it seems to me there's some interesting history out there and I hope you enjoy some of this as much as I do!
9.16.2011
A Hospital In Quinntopia!
I won this scratch-built N scale building off of Yahoo Japan using a service that manages the fulfillment for non-Japanese bidders some time ago. If you aren't aware, there is an interesting, although small, group of folks in Japan who make and sell modern buildings on the Yahoo Japan site. Some of these appear to have the quality of archetectural models and the biddding can go quite high. If you have an interest in modern N scale buildings, its actually quite fun and inspirational to see what they are making (although as I look today, I don't really see anything interesting....they seem to come in bursts so keep checking!). And, as I mentioned, services like I used can actually allow you to bid on them if you are so inclined!
While I liked the modern lines, it lacked detail and, of course, interior lighting. So it has sat on the shelf for a long time until I could find the inspiration to customize it for Quinntopia.
This project kept me busy for probably a total of 12-16 hours altogether! There was a lot of prep work in getting foam core cut to make the interior floor sections (where needed as I didn't need to create floors for every floor), painting, collecting or making the right interior detail pieces, prepping LED strips for installation, etc...
Like several recent projects, this one that was sort of 'half-started' when I originally got it, and I've been determined over the summer to try and finish many of my half complete projects! This is one of the last, so I'm looking forwards to some more kit-bashing in the future! The one unfortunate thing with this building is that I literally have no place to fit it currently on the layout, so there are no photos of what it will look like in its natural environment!
While I liked the modern lines, it lacked detail and, of course, interior lighting. So it has sat on the shelf for a long time until I could find the inspiration to customize it for Quinntopia.
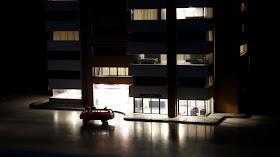
The lighting method is identical to various techniques I've used in the past. And as I typically do with my building lighitng projects, I selectively black out some windows, add shades/drapes to others, and interior details on a select few. Below you can see some of the interior detail. You may be able to make out a bed and various bits of plastic meant to simulate dressers and other items.
I added a back lit "Emergency" sign on the ground floor - which does not show up too well in the photo- and a backlit "H" sign for the top of the building. Nothing too fancy!This project kept me busy for probably a total of 12-16 hours altogether! There was a lot of prep work in getting foam core cut to make the interior floor sections (where needed as I didn't need to create floors for every floor), painting, collecting or making the right interior detail pieces, prepping LED strips for installation, etc...
Like several recent projects, this one that was sort of 'half-started' when I originally got it, and I've been determined over the summer to try and finish many of my half complete projects! This is one of the last, so I'm looking forwards to some more kit-bashing in the future! The one unfortunate thing with this building is that I literally have no place to fit it currently on the layout, so there are no photos of what it will look like in its natural environment!
9.10.2011
Landscape Repair
In the below construction photos from last year, you can see the original alignments, and the start of the new 'hole' to get the Red Line to cross under the elevated viaduct track in a straight direction.
Below is the ultimate alignment of the track - and the complete loss of all the supporting fascia for the viaduct!
A more recent view, with no progress on fixing the viaduct, showing the addition of a siding and turnout to the inside track.
After the glue set on the Styrofoam (be sure to use a Styrofoam safe glue!), I started to apply Sculpt-a-Mold, with a bit of black acrylic paint and a touch of yellow oxide mixed in- just to take the 'bright white' look of the plaster away in case some of it gets exposed.
I used a kitchen spoon to apply until most of the Styrofoam is covered....
Once I get the shape looking right, I smooth out the Styrofoam with the spoon, re-used some of the plaster rock castings from the original cut, and let it dry.
Once dry, I used my homemade 'static grass applicator' (I used the electric fly swatter method that you can find on YouTube and various modelling forums), although the static grass doesn't always give complete coverage, I like to sprinkle a touch of standard, dark green flock over the static grass while the glue is still wet.
I used Sintra once again as a modelling material to create the viaducts taking careful measurements to ensure that errant pantographs don't get caught on the arches!
The (more or less) final look below (before the addition of some details and being painted and weathered)...a huge improvement over the unsightly mess its been for the past year, and a much nicer look than it was in the older "Version 3".


