5.27.2011

More High Speed! New Old TGV Ready to Go!

 
I picked up this older KATO TGV set a while ago and decided to have a pro install the decoders and upgrade the lights to DCC.  Sometimes this is absolutely the only way to go!  As you can see from the photos, it looks great (as always from Kato), but thanks to Alex at DCCTRAIN it runs better than it ever did.  Here's a video from Alex of this TGV with the new decoders, LED's, and some good advice about decoders that I thought was interesting to share.


His point about how quiet it is spot on as well.  I tested this in conventional mode before sending it and it was, as to be expected, a typical loud 1990's era motor.  I don't understand the science of how back EMF makes it quieter, but it does work.  

The strong angular lines are fantastic.  I have to say, of all the great looking high speed trains out there, this older, classic design is probably my favorite.  Even the somewhat garish orange color is awesome...it just says "notice me! I'm fast!" rather than the more mundane and sedate silvers and whites that seem to be the trend these days.

Here's a final shot, in front of the new little field I mentioned earlier.  Have a great weekend!

5.25.2011

Kato Broadcast Building Modifications

Finally got around to mutilating one of those wonderful new modern buildings Kato came out with last year.  The first victim of my three from this run from Kato was what they call the "Broadcast Building", item 23-436.   Although apparently in Japan its referred to as the "Sumitomo Mitsui Bank", which I like better.

I wanted to customize the building, but didn't feel like doing a standard 'double up' just to make it taller.  My impression of it is that its a decent looking modern building, but lacked windows.

Therefore, I decided to cut a big hole and add windows.
And here's the hole:
And here's the finished product....yes, apologies, I skipped some steps in the process.  Here's what I did:
  • Disasembled
  • Painted - exterior with a new beige/tan color, and interior with a thick undercoat of black (to stop light leakage) and then a coat of light grey
  • Painted three different tones of greys to the 7 floors.
  • Added furniture and details to 5 of the 7 floors (using some of my Luetke Modelbahn furnishings and some homemade cubicles)
  • Added LED strips --- these are much easier to use than soldering/wiring individual LED's, although they came with a rubbery 'waterproof' cover that I couldn't remove.  It was strange, but ultimately had no effect.
  • Added extra signs and LED's for the exterior advertising signs.  Mostly using the method explained in this link.
  • Created a new ground floor -- the ground floors that come with Kato's buildings are terrific, unfortunately, their sidewalk doesn't integrate well with any other manufacturers sidewalk, so I had to sacrifice it.
  • Put it together! 
So here are some photos of the interior details and the corporate plastic people forced to work into the late hours....

From the outside, you can pity the sad, alienated corporate stooges sitting in their depressing cubes.
And here's a view from a ways back set into its natural setting:

Now I need to find some more buildings to cut up and some more plastic people to force to work! Har!

5.22.2011

Adding a Field (and other random stuff)


People need to eat, so I planted a field of food stuff.

This is one of those very nice, but also somewhat expensive, sheets of material that are coming to the market from Faller, Heki, and the rest.  This is the F-180471 field from Faller.  Advertised as HO, but really, who's telling?  Those HO guys just don't have the same healthy crops us N'ists do!

I planted this on the corner...actually, its the very first corner that you see of the layout when you enter the 'train room', so it has to be something that looks 'right' but also not something that takes too much attention.  Here's a shot from the other side of the corner. 

The nice thing about this field in this location on the corner is that its still a decent place to set down your controller, train box, or whatever else you happen to be holding but can't find a third hand to hold it.

I've also been playing around with an old Minitrix Class 47 I picked up off eBay a couple of years ago and which has been gathering dust for two years.  I have some 'free-lancing' ideas for this, so I stripped the paint (which was also a test for some other things I want to try and do in the future).  Note to my British friends: The original Minitrix BR blue paint was pretty rough looking and couldn't be saved. Please don't hate me.
The above is after the second coat of 'stripper' (I used Testor's ELO stripper, which seems to work nicely).  The yellow paint was really difficult to remove, but after 4 coats of stripped, and rupping with an old tooth brush, I finally got it down to its pristine shell.

I also 'chipped' it as well.  I used the directions from the folks at the Modellbahn Team Koln Bonn with some help from Google translate to ensure I was getting it 'right'.   I actually think I've seen enough of these older non-DCC circuit board types that I can almost do a DCC install without instructions anymore.  Now that's an achievement! 
 So back to painting...I fired up the airbrush and had some specific ideas for a paint scheme I wanted to try out.  Here's the first coat with Tamiya 'sky':
And after a coat of "Euro Grey" and red, this is what I wound up with:
Yeah, I didn't like it either...so it was back to the ELO for another round of paint stripping.  We'll see what happens next.

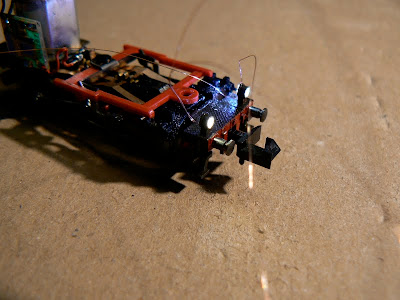
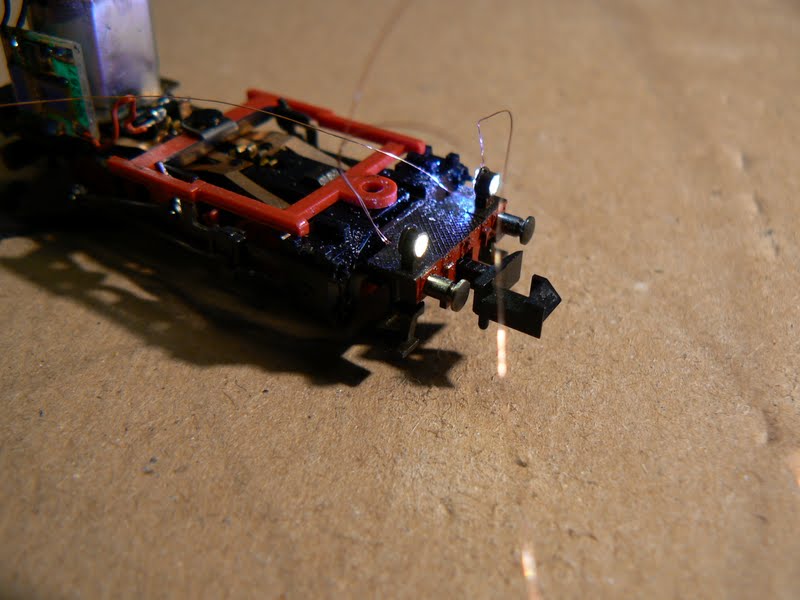
Speaking of digitalization...another locomotive that I've had forever was one of those little 0-6-0 tank engines (a BR 89) that come with those super-cheap starter sets.   I was surprised to see a couple of tutorials on how to add a decoder to one of these, and I also really wanted to give it some lights.   It seemed impossible given its small size, but I gave it a shot.  Surprisingly it worked!  I had to mill out some openings in the lights, and only the two bottom lights will be lit, but this was an excellent application of the tiny SMD's I got from LED Baron.  The worst part of this has been trying to find a place for the bloody resistor! Man, those things are huge when you try to fit them inside these little locomotives!
 
That's all the updates for now.  I've also been tinkering away on one of my Kato buildings, which I'll probably share later this week.   Summer is coming, so blogging will slow down as outdoor activities become a reality once again.  And thanks to everyone for all your kind comments on my video.  Its great to get that kind of encouragement, and I hope to pass it along to you!

5.07.2011

Layout Overview Video

Well, its been well over a year since I've taken video of my layout.  The reason is that I've been working on it with the whole 'version 4.0' expansion! With most of the work done (not all), I thought I'd put together a video of the layout and some of my trains!

5.03.2011

Locomotive Roster: JR Series 285 "Sunrise Express"; Kato 10-387

Good morning train lovers of the world!  To break up the recent stream of French locomotives, here's a fantastic-looking train from Japan! The Kato Series 285 Sunrise Express! So grab some coffee, plant yourself in a seat, and hang on for an early morning, caffeine-fueled double-deck rush across the Japanese landscape!
One thing I like about this train is those crazy looking windows high up on the cab! Neat!

Allright onto serious stuff....

This was a relatively easy DCC install, and rather than show you the details here, I'll just refer you to this great post on the JNS Forum from Inobu who provides instructions on how to install the decoder on the nearly identical chassis/motor of the JR 500.   I used the standard Digitrax DZ125 which not only seems to be working for me lately, they are quite cheap!

As with many (most?) Kato train sets, the motor car is usually one of the center cars, which means you'll also need to install function decoders in the cab cars to get the lights to work properly.  I haven't done this yet, so rather than directionally controlled white/red lights...I have full time orange lights.
This is another exceptional model from Kato.  I love the 'tinted windows' and the near flush appearance they have.  I got excited about this model seeing a video of the prototype, and I have to say the model has all the drama and uniqueness of that video experience I originally saw!
 They say a picture is worth a thousand words, so rather than me telling you how great it looks, here's some photos....

I'm tempted to make one modification...the original video (see below) clearly reveals that the bogies/trucks are not the pristine (and shiny!) light grey that Kato provides them with.  They are a noticeably red/brown rusty color.  And i actually think they make the model look a lot nice.  I'm tempted to weather up the trucks/bogies to get this same look.

I'm also a bit on the fence about installing interior lighting....it always seems a bit disappointing with all the flickering and such, and the lighting always seems way too bright for the prototype.

Ironic huh? A guy that puts lights in all his buildings and runs trains from all sorts of countries is now worried about being 'prototypical'? 

Video proof that even Japanese trains can use a little bit of weathering: